
October 1, 2021 08:13 by
 Peter
PeterIn this article we will be seeing how to create Silverlight Grid Layout using Visual studio 2010. The term layout describes the process of sizing and positioning objects in your Silverlight-based application. In Silverlight we have 3 layout elements namely Canvas, StackPanel and Grid. In this we will be seeing how to create Grid layout in Silverlight.
StackPanel:
It defines a grid area which consists of rows and columns. By default it contains one row and one column. It is the root element used by the Visual Studio Silverlight template. It enables you to o create a variety of object layouts. You can position child controls in specific cells of the Grid by using the Grid.Column and Grid.Row.
Grid.Row:
It is used to place the child controls in the particular row of the grid.
Grid.Column:
It is used to place the child controls in the particular column of the grid.
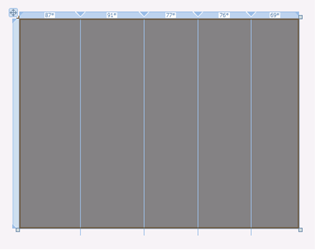
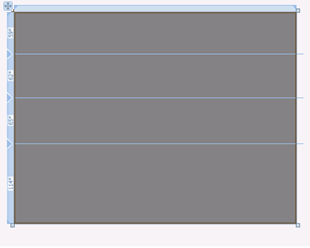
ShowGridLines-True:
If you set ShowGridLines to true gridlines will be shown.

ShowGridLines-False:

Steps Involved:
Creating a Silverlight Application:
- Open Visual Studio 2010.
- Go to File => New => Project.
- Select Silverlight from the Installed templates and choose the Silverlight Application template.
- Enter the Name and choose the location.
- Click OK.
- In the New Silverlight Application wizard check the "Host the Silverlight Application in a new Web site".
- Click OK.
Creating the Grid Layout:
I. Open MainPage.xaml file and replace the code with the following.
<UserControl x:Class="SilverlightApplication1.MainPage"
xmlns="http://schemas.microsoft.com/winfx/2006/xaml/presentation"
xmlns:x="http://schemas.microsoft.com/winfx/2006/xaml"
xmlns:d="http://schemas.microsoft.com/expression/blend/2008"
xmlns:mc="http://schemas.openxmlformats.org/markup-compatibility/2006"
mc:Ignorable="d"
d:DesignHeight="300" d:DesignWidth="400">
<Grid x:Name="layoutRoot" ShowGridLines="True" Height="200" Width="400" Background="Orange">
<Grid.RowDefinitions>
<RowDefinition Height="32*" />
<RowDefinition Height="121*" />
</Grid.RowDefinitions>
<TextBlock Text="PROFILE" FontFamily="Verdana" FontSize="14" FontWeight="Bold" Foreground="White" Margin="14,20,-14,99"
Grid.RowSpan="2"></TextBlock>
<Grid Grid.Row="1" ShowGridLines="True" Background="White">
<Grid.ColumnDefinitions>
<ColumnDefinition Width="144*" />
<ColumnDefinition Width="256*" />
</Grid.ColumnDefinitions>
<Grid.RowDefinitions>
<RowDefinition Height="50*" />
<RowDefinition Height="50*" />
<RowDefinition Height="50*" />
<RowDefinition Height="50*" />
<RowDefinition Height="50*" />
</Grid.RowDefinitions>
<TextBlock Text="Name :" FontFamily="Verdana" Grid.Row="1" Grid.Column="0" FontSize="14" FontWeight="Bold" Foreground="Green" Margin="14,10,-14,21" Grid.RowSpan="2" ></TextBlock>
<TextBlock Text="About Me :" FontFamily="Verdana" Grid.Row="2" Grid.Column="0" FontSize="14" FontWeight="Bold" Foreground="Green" Margin="14,10,-14,21" Grid.RowSpan="2" ></TextBlock>
<TextBlock Text="Country :" FontFamily="Verdana" Grid.Row="3" Grid.Column="0" FontSize="14" FontWeight="Bold" Foreground="Green" Margin="14,10,-14,21" Grid.RowSpan="2" ></TextBlock>
<TextBlock Text="Vijai Anand.R" FontFamily="Verdana" Grid.Row="1" Grid.Column="1" FontSize="14" FontWeight="Bold" Foreground="Green" Margin="14,10,-14,21" Grid.RowSpan="2"></TextBlock>
<TextBlock Text="SharePoint Developer" FontFamily="Verdana" Grid.Row="2" Grid.Column="1" FontSize="14" FontWeight="Bold" Foreground="Green" Margin="14,10,-14,21" Grid.RowSpan="2"></TextBlock>
<TextBlock Text="India" FontFamily="Verdana" Grid.Row="3" Grid.Column="1" FontSize="14" FontWeight="Bold" Foreground="Green" Margin="14,10,-14,21" Grid.RowSpan="2"></TextBlock>
</Grid>
</Grid>
</UserControl>
ii. Build the solution.
iii. Hit ctrl+F5.