November 29, 2022 06:56 by
 Peter
PeterIn this article, I will discuss how you can create your own File Upload feature in a Silverlight application.

Step 1
First, create a Silverlight Web application in Visual Studio 2008. You will see your default Page.xaml.
Step 2
On Create Page.xaml, change your code by adding the following Panel, Button, and TextBlock controls.
On the button click event handler, I write code to call the OpenFileDialog that allows us to browse files and gives us the selected file name. Here is the code.
public void Button_Click(object sender, RoutedEventArgs e) {
OpenFileDialog dlg = new OpenFileDialog();
dlg.Multiselect = false;
dlg.Filter = "All files (*.*)|*.*|PNG Images (*.png)|*.png";
bool ? retval = dlg.ShowDialog();
if (retval != null && retval == true) {
UploadFile(dlg.File.Name, dlg.File.OpenRead());
StatusText.Text = dlg.File.Name;
}
else {
StatusText.Text = "No file selected...";
}
}
As you can see from the above code, I call a method UploadFile by passing the selected file name from the OpenFileDialog.
The UploadFile method looks like the following. In this code, I use a WebClient class and a PushData method.
private void UploadFile(string fileName, Stream data)
{
UriBuilder ub = new UriBuilder("http://localhost:3840/receiver.ashx");
ub.Query = string.Format("filename={0}", fileName);
WebClient c = new WebClient();
c.OpenWriteCompleted += (sender, e) =>
{
PushData(data, e.Result);
e.Result.Close();
data.Close();
};
c.OpenWriteAsync(ub.Uri);
}
private void PushData(Stream input, Stream output)
{
byte[] buffer = new byte[4096];
int bytesRead;
while ((bytesRead = input.Read(buffer, 0, buffer.Length)) != 0)
{
output.Write(buffer, 0, bytesRead);
}
}
Step 3
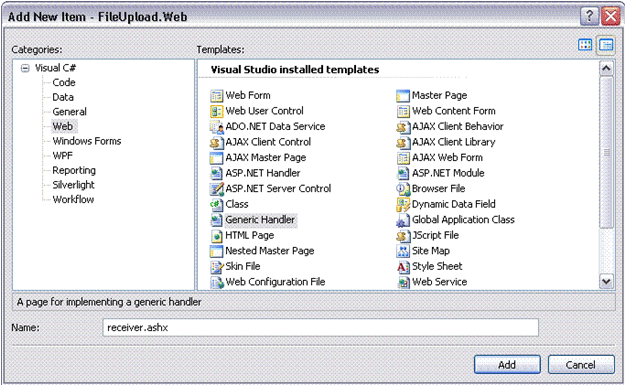
Add a new Generic Handler receiver.ashx.
Now let's add a class. Right-click on the project and add a new item by selecting Generic Handler in the right side templates as shown below.

And add the following code on the code behind-
<%@ WebHandler Language="C#" Class="receiver" %>
using System;
using System.Web;
using System.IO;
public class receiver : IHttpHandler {
public void ProcessRequest (HttpContext context) {
string filename = context.Request.QueryString["filename"].ToString();
using (FileStream fs = File.Create(context.Server.MapPath("~/App_Data/" + filename)))
{
SaveFile(context.Request.InputStream, fs);
}
}
private void SaveFile(Stream stream, FileStream fs)
{
byte[] buffer = new byte[4096];
int bytesRead;
while ((bytesRead = stream.Read(buffer, 0, buffer.Length)) != 0)
{
fs.Write(buffer, 0, bytesRead);
}
}
public bool IsReusable {
get {
return false;
}
}
}
Step 4
Build and Run
That's all. You are done. Now just build and run your project.
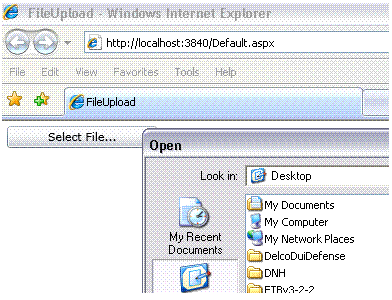
When you click the Select File button, you will see Browse files dialog that lets you browse the files.

Note
You need to make sure your folder on the Web has to write permissions to upload files.
Summary
In this article, we learned about File Upload in Silverlight with an example.