European Silverlight Hosting BLOG

BLOG about Latest Silverlight Hosting and Its Techologies - Dedicated to European Windows Hosting Customer

European Silverlight 6 Hosting :: Retrieving Data in Silverlight: Where is my data?

clock March 27, 2019 09:46 by author Peter

So I was plugging right along in Silverlight using LINQ to asynchronously pull data from our database into my C# code. Everything was going great until I attempted to pull data from one table and its related tables all in one query. Here is what I found which resolved my data problem.

In my Library class I have the following code that enables my ASP.NET code to query a User by UserID and return a User object along with their UserFavorites and Illustration objects. This gives me everything I need to know about the user and their favorite illustrations.
public IQueryable<MyLibrary.User> GetUserByID(int userID)

{
    return myContext.Users.Include("UserFavorites").Include("UserFavorites.Illustration")
        .Where(u => u.UserID == userID);
}

In Silverlight I had a need to perform the same query using LINQ. After much searching on the web I found the two things that were needed to make this happen.
1. Use "Expand" instead of "Include"

2. Instead of "UserFavorites.Illustration" replace the "." with a "/" to get "UserFavorites/Illustration".

    int userID = 0;
    var qUser = ((DataServiceQuery<User>)(from myUser in service.Users
                  where myUser.UserID.Equals(userID)
                  select myUser))
                .Expand("UserFavorites")
                .Expand("UserFavorites/Illustration");

Now I have all of my data and I am happy once again. Using the Expand on my query is very nice in that I can get all of my data in one asynchronous call.

HostForLIFE.eu Silverlight 6 Hosting
HostForLIFE.eu is European Windows Hosting Provider which focuses on Windows Platform only. We deliver on-demand hosting solutions including Shared hosting, Reseller Hosting, Cloud Hosting, Dedicated Servers, and IT as a Service for companies of all sizes. We have customers from around the globe, spread across every continent. We serve the hosting needs of the business and professional, government and nonprofit, entertainment and personal use market segments.


Silverlight 6 Hosting - HostForLIFE.eu :: Create an Analog Clock application in Silverlight

clock March 22, 2019 11:17 by author Peter

Today, I will explain you how to create an analog clock apps in Silverlight 6. Of course open new projectin visual studio and select a Silverlight project. In Mainpage.xaml  draw an ellipse which will serve as background for our Analog clock. The code looks as following:


<Grid x:Name="LayoutRoot" Background="White">
        <Ellipse Margin="165,67,145,83" Fill="Goldenrod" Width="330"
         Height="330" Opacity="0.7"/>
    </Grid>

Then, draw another ellipse in the same grid which will serve as Outer Rim for our analog clock. The Complete code looks on the below:
<Ellipse Height="330" Margin="156,58,154,92" Width="330" 
Stroke="Goldenrod">
            <Ellipse.Fill>
<LinearGradientBrush EndPoint="0.84,0.87" Opacity="0.9"  
StartPoint="0.164,0.129">
                    <GradientStop Color="Goldenrod"/>
                    <GradientStop Color="Gold" Offset="0.7"/>
                </LinearGradientBrush>
            </Ellipse.Fill>
        </Ellipse>              


Next, I want to draw another ellipse in the same grid which will serve as Bevel for our analog clock. And this is the code that I used:
        <Ellipse Height="290" Margin="156,58,154,92" Width="290" Stroke="Goldenrod">
            <Ellipse.Fill>
                    <LinearGradientBrush EndPoint="0.84,0.87" Opacity="0.5" StartPoint="0.164,0.129">
                    <GradientStop Color="Goldenrod"/>
                    <GradientStop Color="Goldenrod" Offset="0.987"/>
                </LinearGradientBrush>
            </Ellipse.Fill>
        </Ellipse>     

Now draw another ellipse in the same grid which will serve as a Face for our analog clock. This is the code snippet:
<Ellipse Height="270" Margin="176,78,174,112" Width="270"
         Stroke="Goldenrod" Fill="Yellow" Opacity="0.3"/>

Now we are going to draw the hour,minute and seconds hand. Then draw a rectangle in the same grid which will serve as a Hour hand for our analog clock with the code below:
<Rectangle x:Name="hourHand" Height="59" Margin="315.75,180,314.25,0"
        VerticalAlignment="Top" Fill="Black" Stroke="Black" Width="10" RenderTransformOrigin="0.525,1.428">
            <Rectangle.RenderTransform>
                <RotateTransform x:Name="hourHandAnimation"/>
            </Rectangle.RenderTransform>
        </Rectangle>


Now draw another rectangle in the same grid which will serve as a Minute hand for our analog clock. And this is the code that I used:
<Rectangle x:Name="minuteHand" Height="80" Margin="316.75,160,315.25,0"       
VerticalAlignment="Top" Fill="Black" Stroke="Black" Width="8"
        RenderTransformOrigin="0.5,1.312" >
            <Rectangle.RenderTransform>
                <RotateTransform x:Name="minuteHandAnimation"/>
            </Rectangle.RenderTransform>
        </Rectangle>

Now we are going to draw another rectangle in the same grid which will serve as a Seconds hand for our analog clock. And this is the code that I used:
<Rectangle Height="80" Margin="318.25,160,316.75,0"
        VerticalAlignment="Top" Fill="#FFFF0000" Stroke="#FF000000"
        Width="5" RenderTransformOrigin="0.10,1.312" >
            <Rectangle.RenderTransform>
                <RotateTransform x:Name="secondHandAnimation"/>
            </Rectangle.RenderTransform>
        </Rectangle>

Now, our design part is complete. Now we have to give animations to our hour, minute and second’s hands. For this, let us take a storyboard. We should write the code for storyboard outside the Grid.  The complete code for all the three animations is as follows.
<UserControl.Resources>
        <Storyboard x:Name="silverlightClock">
            <DoubleAnimation x:Name="hourAnimation"                            
                             Storyboard.TargetName="hourHandAnimation"
                             Storyboard.TargetProperty="Angle"
                             Duration="12:0:0" RepeatBehavior="Forever" To="360"/>          
            <DoubleAnimation x:Name="minuteAnimation"
                             Storyboard.TargetName="minuteHandAnimation"
                             Storyboard.TargetProperty="Angle"
                             Duration="1:0:0" RepeatBehavior="Forever"/>                                                                
            <DoubleAnimation x:Name="secondAnimation"                            
                             Storyboard.TargetName="secondHandAnimation"
                             Storyboard.TargetProperty="Angle"
                             Duration="0:1:0" RepeatBehavior="Forever"/>                                   
 </Storyboard>
 </UserControl.Resources>

Now we have to write the code for these 3 animations (hourAnimation, minuteAnimation  and secondAnimation ) in MainPage.xaml.cs. The code looks as follows.
private void startClock(object sender, RoutedEventArgs e)
        {
            System.DateTime currentTime = DateTime.Now;
double hourAngle = ((float)currentTime.Hour) / 12 * 360 +                 
currentTime.Minute/2;          
hourAnimation.From = hourAngle;
            hourAnimation.To = hourAngle + 360;         
           double minuteAngle = ((float)currentTime.Minute) / 60 * 360;
            minuteAnimation.From = minuteAngle;
            minuteAnimation.To=minuteAngle+360;
           double secondAngle = ((float)currentTime.Second) / 60 * 360;
            secondAnimation.From = secondAngle;
            secondAnimation.To = secondAngle + 360;
            silverlightClock.Begin();
        }                          

We need to call the method “startClock” in our grid control and assign it to “Loaded” property of the grid control. The code for this looks as follows.
  <Grid x:Name="LayoutRoot" Background="White" Loaded="startClock"> 
</Grid>


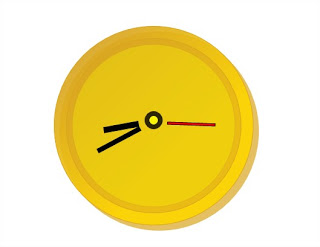
Finally! Our Analog clock is ready. Now you should refresh and see it.

HostForLIFE.eu Silverlight 6 Hosting
HostForLIFE.eu is European Windows Hosting Provider which focuses on Windows Platform only. We deliver on-demand hosting solutions including Shared hosting, Reseller Hosting, Cloud Hosting, Dedicated Servers, and IT as a Service for companies of all sizes. We have customers from around the globe, spread across every continent. We serve the hosting needs of the business and professional, government and nonprofit, entertainment and personal use market segments.


European Silverlight 6 Hosting - Nederland :: Silverlight 5 Viewbox Control

clock March 15, 2019 09:45 by author Peter

This article will explore how to use the ViewBox control in Silverlight 6. The ViewBox control allows you to place a child control such as Image within it in such a way that it will be scaled appropriately to fit the available without any distortion. It is typically used in 2D graphics.

We will begin with creating a new Silverlight 6 project. Modify the existing XAML code of MainPage.xaml so that a Grid of 1 column and three rows is created. The code for the same is shown below:

<UserControl x:Class="SilverlightDemo.MainPage"
    xmlns="http://schemas.microsoft.com/winfx/2006/xaml/presentation"
    xmlns:x="http://schemas.microsoft.com/winfx/2006/xaml"
    xmlns:d="http://schemas.microsoft.com/expression/blend/2008"
    xmlns:mc=http://schemas.openxmlformats.org/markup-compatibility/2006 mc:Ignorable="d" xmlns:sdk=http://schemas.microsoft.com/winfx/2006/xaml/presentation/ sdk HorizontalAlignment="Stretch" VerticalAlignment="Stretch">
    <Grid x:Name="LayoutRoot" Background="White" Height="300" Width="300">
        <Grid.ColumnDefinitions>
            <ColumnDefinition Width="200" />
        </Grid.ColumnDefinitions>
        <Grid.RowDefinitions>
            <RowDefinition Height="Auto" />
            <RowDefinition Height="Auto" />
            <RowDefinition Height="Auto" />
        </Grid.RowDefinitions>
    </Grid>
</UserControl>

Drag and drop the Viewbox control from the Toolbox into the XAML code between the <Grid></Grid> tags. Specify its row and column in the grid to be 0. The resulting code is seen below.

<UserControl x:Class="SilverlightDemo.MainPage"
    xmlns="http://schemas.microsoft.com/winfx/2006/xaml/presentation"
    xmlns:x="http://schemas.microsoft.com/winfx/2006/xaml"
    xmlns:d="http://schemas.microsoft.com/expression/blend/2008"
    xmlns:mc=http://schemas.openxmlformats.org/markup-compatibility/2006 mc:Ignorable="d" xmlns:sdk=http://schemas.microsoft.com/winfx/2006/xaml/presentation/ sdk HorizontalAlignment="Stretch" VerticalAlignment="Stretch">        <Grid.ColumnDefinitions>
            <ColumnDefinition Width="200" />
        </Grid.ColumnDefinitions>
        <Grid.RowDefinitions>
            <RowDefinition Height="Auto" />
            <RowDefinition Height="Auto" />
            <RowDefinition Height="Auto" />
        </Grid.RowDefinitions>
         <controls:Viewbox Grid.Row="0" Grid.Column="0" Height="120" Width="120">
  </controls:Viewbox
    </Grid>
</UserControl>

Right click on the project name in the Solution Explorer pane and select Add Existing Item option. Choose the image "Winter.jg" from the My Documents\My Pictures\Sample Pictures folder.

Drag and drop an Image control in between the <controls:ViewBox> and </controls:ViewBox> tag and modify its code as shown below, to specify its source and size.

    <Grid x:Name="LayoutRoot" Background="White" Height="300" Width="300">
        <Grid.ColumnDefinitions>
            <ColumnDefinition Width="200" />
        </Grid.ColumnDefinitions>
        <Grid.RowDefinitions>
            <RowDefinition Height="Auto" />
            <RowDefinition Height="Auto" />
            <RowDefinition Height="Auto" />
        </Grid.RowDefinitions>
         <controls:Viewbox Grid.Row="0" Grid.Column="0" Height="120" Width="120">
            <Image Source="Winter.jpg" Height="40" Width="40"></Image>
        </controls:Viewbox>
    </Grid>

Drag and drop another ViewBox and then an Image control in between the second <controls:ViewBox> and </controls:ViewBox> tag.

Modify the XAML as shown below:

    <Grid x:Name="LayoutRoot" Background="White" Height="300" Width="300">
        <Grid.ColumnDefinitions>
            <ColumnDefinition Width="200" />
        </Grid.ColumnDefinitions>
        <Grid.RowDefinitions>
            <RowDefinition Height="Auto" />
            <RowDefinition Height="Auto" />
            <RowDefinition Height="Auto" />
        </Grid.RowDefinitions>
         <controls:Viewbox Grid.Row="0" Grid.Column="0" Height="120" Width="120">
            <Image Source="Winter.jpg" Height="40" Width="40"></Image>
        </controls:Viewbox>
<controls:Viewbox Grid.Row="1" Grid.Column="0" Height="70" Width="90">
    <Image Source="Winter.jpg" Height="40" Width="40"></Image></controls:Viewbox
    </Grid>

Save the solution, build and execute it. When you see the output, you will observe that the two images show no distortion whatsoever though their height and width are not the same. This has happened because of the ViewBox.

HostForLIFE.eu Silverlight 6 Hosting
HostForLIFE.eu is European Windows Hosting Provider which focuses on Windows Platform only. We deliver on-demand hosting solutions including Shared hosting, Reseller Hosting, Cloud Hosting, Dedicated Servers, and IT as a Service for companies of all sizes. We have customers from around the globe, spread across every continent. We serve the hosting needs of the business and professional, government and nonprofit, entertainment and personal use market segments.


Silverlight 6 Hosting Netherland - HostForLIFE.eu :: Image Brush in Silverlight

clock March 1, 2019 11:07 by author Peter

This article demonstrates how to create and use an image brush in Silverlight using XAML and C#.

z

Image Brush
An image brush paints an area with an image. The ImageSource property represents the image to be used during the painting by an image brush. The ImageBrush object represents an image brush.

Creating an Image Brush
The ImageBrush element in XAML creates an image brush. The ImageSource property of the ImageBrush represents the image used in the painting process.

The following code snippet creates an image brush and sets the ImageSource property to an image.
<ImageBrush ImageSource="dock.jpg" />


We can fill a shape with an image brush by setting a shape's Fill property to the image brush. The code snippet in Listing 1 creates a rectangle shape sets the Fill property to an ImageBrush.
<Rectangle
    Width="200"
    Height="100"
    Stroke="Black"
    StrokeThickness="4">
    <Rectangle.Fill>
        <ImageBrush ImageSource="dock.jpg" />
    </Rectangle.Fill>
</Rectangle>

Listing 1
The CreateAnImageBrush method listed in Listing 2 draws same rectangle with an image brush in Figure 1 dynamically.
/// <summary>
/// Fills a rectangle with an ImageBrush
/// </summary>
public void CreateAnImageBrush()
{
    // Create a Rectangle

    Rectangle blueRectangle = new Rectangle();
    blueRectangle.Height = 100;
    blueRectangle.Width = 200;

     // Create an ImageBrush
    ImageBrush imgBrush = new ImageBrush();
     imgBrush.ImageSource =
        new BitmapImage(new Uri(@"Dock.jpg", UriKind.Relative));
     // Fill rectangle with an ImageBrush

    blueRectangle.Fill = imgBrush;

    // Add Rectangle to the Grid.
    LayoutRoot.Children.Add(blueRectangle);
}

HostForLIFE.eu Silverlight 6 Hosting
HostForLIFE.eu is European Windows Hosting Provider which focuses on Windows Platform only. We deliver on-demand hosting solutions including Shared hosting, Reseller Hosting, Cloud Hosting, Dedicated Servers, and IT as a Service for companies of all sizes. We have customers from around the globe, spread across every continent. We serve the hosting needs of the business and professional, government and nonprofit, entertainment and personal use market segments.


About HostForLIFE

HostForLIFE is European Windows Hosting Provider which focuses on Windows Platform only. We deliver on-demand hosting solutions including Shared hosting, Reseller Hosting, Cloud Hosting, Dedicated Servers, and IT as a Service for companies of all sizes.

We have offered the latest Windows 2019 Hosting, ASP.NET 5 Hosting, ASP.NET MVC 6 Hosting and SQL 2019 Hosting.


Tag cloud

Sign in