European Silverlight Hosting BLOG

BLOG about Latest Silverlight Hosting and Its Techologies - Dedicated to European Windows Hosting Customer

Silverlight 6 Hosting - HostForLIFE.eu :: How to Create a Similar List like Mac using Silverlight

clock October 8, 2015 13:09 by author Rebecca

In this tutorial, we will create the standard Silverlight ListBox will be customized to be functionally similar to a ListBox you would find on a Mac.

The XAML for this tutorial contains a custom style that we use to disable the scrollbar:

<UserControl x:Class="CustomListBox.Page"
    xmlns="http://schemas.microsoft.com/winfx/2006/xaml/presentation"
    xmlns:x="http://schemas.microsoft.com/winfx/2006/xaml"
    Width="400" Height="300">
    <Grid x:Name="LayoutRoot" Background="White">
        <Grid.Resources>
            <Style x:Key="ListBoxStyle1" TargetType="ListBox">
                <Setter Property="Template">
                    <Setter.Value>
                        <ControlTemplate TargetType="ListBox">
                            <Grid x:Name="LayoutRoot">
                                <Border Padding="5" BorderBrush="#000000" BorderThickness="1" Background="#ffffff" CornerRadius="0">
                                    <ScrollViewer x:Name="ScrollViewer" VerticalScrollBarVisibility="Hidden" Padding="{TemplateBinding Padding}" Background="{TemplateBinding Background}" BorderBrush="Transparent" BorderThickness="0">
                                        <ItemsPresenter />
                                    </ScrollViewer>
                                </Border>
                            </Grid>
                        </ControlTemplate>
                    </Setter.Value>
                </Setter>
            </Style>
        </Grid.Resources>
        <StackPanel Margin="4" HorizontalAlignment="Left">
            <RepeatButton Width="200" Height="22" Click="Up_Click">
                <Polygon Points="5,0 10,10 0,10 5,0" Fill="#222222" />
            </RepeatButton>
            <ListBox x:Name="listbox" Width="200" Height="150" Style="{StaticResource ListBoxStyle1}">
                <ListBoxItem Content="Item 1" />
                <ListBoxItem Content="Item 2" />
                <ListBoxItem Content="Item 3" />
                <ListBoxItem Content="Item 4" />
                <ListBoxItem Content="Item 5" />
                <ListBoxItem Content="Item 6" />
                <ListBoxItem Content="Item 7" />
                <ListBoxItem Content="Item 8" />
                <ListBoxItem Content="Item 9" />
                <ListBoxItem Content="Item 10" />
                <ListBoxItem Content="Item 11" />
                <ListBoxItem Content="Item 12" />
            </ListBox>
            <RepeatButton Width="200" Height="22" Click="Down_Click">
                <Polygon Points="5,10 10,0 0,0 5,10" Fill="#222222" />
            </RepeatButton>
        </StackPanel>
    </Grid>
</UserControl>

In XAML, just apply the custom style and populate it with some test data.  There are also two repeat buttons, an up and down that will handle the scrolling for us:

using System;
using System.Collections.Generic;
using System.Linq;
using System.Net;
using System.Windows;
using System.Windows.Controls;
using System.Windows.Documents;
using System.Windows.Input;
using System.Windows.Media;
using System.Windows.Media.Animation;
using System.Windows.Shapes;

namespace CustomListBox
{
    public partial class Page : UserControl
    {
        public Page()
        {
            InitializeComponent();
        }

        private void Up_Click(object sender, RoutedEventArgs e)
        {
            if (listbox.Items.Count > 0)
            {
                int newIndex = listbox.SelectedIndex - 1;

                if (newIndex < 0)
                {
                    newIndex = 0;
                }
                listbox.SelectedIndex = newIndex;
            }
        }

        private void Down_Click(object sender, RoutedEventArgs e)
        {
            if (listbox.Items.Count > 1)
            {
                int newIndex = listbox.SelectedIndex + 1;

                if (newIndex >= listbox.Items.Count)
                {
                    newIndex = listbox.Items.Count - 1;
                }
                listbox.SelectedIndex = newIndex;
            }
        }
    }
}

And now we're done!

HostForLIFE.eu Silverlight 6 Hosting
HostForLIFE.eu is European Windows Hosting Provider which focuses on Windows Platform only. We deliver on-demand hosting solutions including Shared hosting, Reseller Hosting, Cloud Hosting, Dedicated Servers, and IT as a Service for companies of all sizes. We have customers from around the globe, spread across every continent. We serve the hosting needs of the business and professional, government and nonprofit, entertainment and personal use market segments.


Silverlight 6 Hosting - HostForLIFE.eu :: How to Control Playback in A Video

clock September 17, 2015 11:07 by author Rebecca

Using videos in a Silverlight based application is a very exciting feature. In this article, we will learn how we can control the playback of movie using some coding in code-behind. Let's see how!

Dealing with Automatic Start

By default videos automaticall get started when we run the project, it is distracting feature from the users point of view. To change auto start false, select the video on stage and in properties uncheck the 'AutoPlay' option.

Dealing with Endless Playback

By default, when the video reaches the end then it stops and does not start again. To change such a setting follow the steps:

1. Select the video on stage

2. In Properties, switch the mode from 'Properties' to 'Events'.

3. In the Event list, point to 'MediaEnded' label and type the event handler name (I will be using md_ended_eve) and then press tab to apply it and it automatically switches you to code-behind with a new event.

4. Now type the following code inside event handler:

(intro_wmv).Stop();
(intro_wmv).Play();

In above code 'intro_wmv' is my media fine name.

5. Now test the application.

XAML Code
<Grid
          xmlns="http://schemas.microsoft.com/winfx/2006/xaml/presentation"
          xmlns:x="http://schemas.microsoft.com/winfx/2006/xaml"
          x:Class="SilverlightApplication1.MainPage"
          Width="640" Height="480">
          <MediaElement x:Name="intro_wmv"
          Margin="54,64,104,60"
          Source="/intro.wmv"
          Stretch="Fill"
          MediaEnded="md_ended_eve" AutoPlay="False"/>
</Grid>

XAML.CS Code
using System;
using System.Windows;
using System.Windows.Controls;
using System.Windows.Documents;
using System.Windows.Ink;
using System.Windows.Input;
using System.Windows.Media;
using System.Windows.Media.Animation;
using System.Windows.Shapes;
namespace SilverlightApplication1
{
       public partial class MainPage : Grid
       {
              public MainPage()
              {
                     // Required to initialize variables
                     InitializeComponent();
              }
              private void md_ended_eve(object sender, System.Windows.RoutedEventArgs e)
              {
                     // TODO: Add event handler implementation here.
                     (intro_wmv).Stop();
                     (intro_wmv).Play();
              }
       }
}

Control Video Playback by Pause and Play

By default in Silverlight video plays and we can't control it by pausing and playing. But by writing some lines in code-behind we can control this playback. For this we have to create the event as we saw in above example. Let's follow the steps:

1. Open the event explorer by switching the property (look above image).

2. Type the event name in 'MouseLeftButtonDown', I will be using here 'pause_start_evn' and press tab to switch in event handler mode.

3. In the appeared event type the following code:

private bool IsPaused=true;
private void pause_start_evn(object sender, System.Windows.Input.MouseButtonEventArgs e)
              {
                     // TODO: Add event handler implementation here.
                     if(IsPaused)
                     {
                           (intro_wmv as MediaElement).Play();
                           IsPaused=false;
                     }
                     else
                     {
                           (intro_wmv as MediaElement).Pause();
                           IsPaused=true;
                     }
   }

4. Now test the application and check by right mouse click on video surface.

XAML Code
<Grid
          xmlns="http://schemas.microsoft.com/winfx/2006/xaml/presentation"
          xmlns:x="http://schemas.microsoft.com/winfx/2006/xaml"
          x:Class="SilverlightApplication1.MainPage"
          Width="640" Height="480">
          <MediaElement x:Name="intro_wmv"
          Margin="54,64,104,60"
          Source="/intro.wmv"
          Stretch="Fill"
          MediaEnded="md_ended_eve"
          MouseLeftButtonDown="pause_start_evn"/>
</Grid>

XAXM.CS Code

using System;
using System.Windows;
using System.Windows.Controls;
using System.Windows.Documents;
using System.Windows.Ink;
using System.Windows.Input;
using System.Windows.Media;
using System.Windows.Media.Animation;
using System.Windows.Shapes;

namespace SilverlightApplication1
{
       public partial class MainPage : Grid
       {
              public MainPage()
              {
                     // Required to initialize variables
                     InitializeComponent();
              }

              private void md_ended_eve(object sender, System.Windows.RoutedEventArgs e)
              {
                     // TODO: Add event handler implementation here.
                     (intro_wmv).Stop();
                     (intro_wmv).Play();
              }
              private bool IsPaused=true;
              private void pause_start_evn(object sender, System.Windows.Input.MouseButtonEventArgs e)
              {
                     // TODO: Add event handler implementation here.
                     if(IsPaused)
                     {
                           (intro_wmv as MediaElement).Play();
                           IsPaused=false;
                     }
                     else
                     {
                           (intro_wmv as MediaElement).Pause();
                           IsPaused=true;
                     }
              }
       }
}

Now, that's all about the controlling of video playback in a Silverlight based application. Happy coding!

HostForLIFE.eu Silverlight 6 Hosting
HostForLIFE.eu is European Windows Hosting Provider which focuses on Windows Platform only. We deliver on-demand hosting solutions including Shared hosting, Reseller Hosting, Cloud Hosting, Dedicated Servers, and IT as a Service for companies of all sizes. We have customers from around the globe, spread across every continent. We serve the hosting needs of the business and professional, government and nonprofit, entertainment and personal use market segments.


Silverlight 6 Hosting - HostForLIFE.eu :: How to Use ASP.NET to Create Silverlight Clock Apps

clock September 10, 2015 11:37 by author Rebecca

In this post, we will learn how to create Analog Clock completely from code behind using .NET Silverlight.

Step 1

Create a new project in Visual Studio and select "Silverlight Application".

Step 2

Open MainPage.xaml and add the following code:


    <UserControl x:Class="SilverlightAnalogClock.MainPage" 
        xmlns="http://schemas.microsoft.com/winfx/2006/xaml/presentation" 
        xmlns:x="http://schemas.microsoft.com/winfx/2006/xaml" 
        xmlns:d="http://schemas.microsoft.com/expression/blend/2008" 
        xmlns:mc="http://schemas.openxmlformats.org/markup-compatibility/2006" 
        mc:Ignorable="d" 
        d:DesignHeight="300" d:DesignWidth="400"> 
     
        <Grid x:Name="LayoutRoot" Background="White"> 
            
        </Grid> 
    </UserControl> 

Step 3

Open MainPage.xaml.cs and add the following code:

    using System; 
    using System.Collections.Generic; 
    using System.Linq; 
    using System.Net; 
    using System.Windows; 
    using System.Windows.Controls; 
    using System.Windows.Documents; 
    using System.Windows.Input; 
    using System.Windows.Media; 
    using System.Windows.Media.Animation; 
    using System.Windows.Media.Imaging; 
    using System.Windows.Shapes; 
     
    namespace SilverlightAnalogClock 
    { 
        public partial class MainPage : UserControl 
        { 
     
            public Canvas ClockArea = null; 
            public Rectangle secondHand = null; 
            public Rectangle minuteHand = null; 
            public Rectangle hourHand = null; 
     
            public RotateTransform secondHandRotate = null; 
            public RotateTransform minuteHandRotate = null; 
            public RotateTransform hourHandRotate = null; 
     
            public Ellipse outerCircle = null; 
     
            public Point centerPoint; 
            public double HEIGHT  = 0; 
            public double WIDTH  = 0; 
            public double RADIUS = 0; 
     
            public MainPage() 
            { 
                InitializeComponent(); 
     
                ClockArea = new Canvas() 
                { 
     
                    Width = 300, 
                    Height = 300, 
                    HorizontalAlignment = HorizontalAlignment.Left, 
                    VerticalAlignment = VerticalAlignment.Top 
     
                }; 
     
                ClockArea.SetValue(Grid.RowProperty, 0); 
                ClockArea.SetValue(Grid.ColumnProperty, 0); 
                ClockArea.Margin = new Thickness(0, 0, 0, 0); 
                this.LayoutRoot.Children.Add(ClockArea); 
     
                WIDTH = ClockArea.Width; 
                HEIGHT = ClockArea.Height; 
                centerPoint.X = (WIDTH/2); 
                centerPoint.Y = (HEIGHT/2); 
                      
                RADIUS = 400; 
                DrawClockFace(); 
     
                Point TOPPOINT = new Point(0, 0); 
     
                DrawMinuteHand(); 
                DrawSecondHand(); 
                DrawHourHand(); 
                DrawCenterCircle(); 
     
     
                //Start the Clock 
                ClockStart(); 
                 
     
            } 
     
            public void ClockStart() 
            { 
                // Create and Start the Thread Timer 
                System.Windows.Threading.DispatcherTimer clockTimer = new System.Windows.Threading.DispatcherTimer(); 
                clockTimer.Interval = new TimeSpan(0, 0, 0, 0, 1000); 
                clockTimer.Tick += new EventHandler(Clock_Tick); 
                clockTimer.Start(); 
            } 
     
            // Get and Set the Angles of Each Hand at every Clock Ticks 
            public void Clock_Tick(object o, EventArgs sender) 
            { 
                double hourRotateValue = Convert.ToDouble(DateTime.Now.Hour.ToString()); 
                double minuteRotateValue = Convert.ToDouble(DateTime.Now.Minute.ToString()); 
                double secondRotateValue = Convert.ToDouble(DateTime.Now.Second.ToString()); 
                hourRotateValue = (hourRotateValue + minuteRotateValue / 60) * 30; 
                minuteRotateValue = (minuteRotateValue + secondRotateValue / 60) * 6; 
                secondRotateValue = Convert.ToDouble(DateTime.Now.Second.ToString()) * 6; 
                minuteHandRotate.Angle = minuteRotateValue; 
                hourHandRotate.Angle = hourRotateValue; 
                secondHandRotate.Angle = secondRotateValue; 
            } 
     
            // Draw Center Circle 
            public void DrawCenterCircle() 
            {             
                Ellipse centerCircle = new Ellipse() 
                { 
     
                    Width = 10, 
                    Height = 10, 
                    Stroke = new SolidColorBrush(Colors.Red), 
                    Fill = new SolidColorBrush(Colors.Red), 
                    HorizontalAlignment = HorizontalAlignment.Center, 
                    VerticalAlignment = VerticalAlignment.Center 
     
                }; 
     
                centerCircle.SetValue(Grid.RowProperty, 0); 
                centerCircle.SetValue(Grid.ColumnProperty, 0); 
                Canvas.SetLeft(centerCircle, (WIDTH / 2) - (centerCircle.Width / 2)); 
                Canvas.SetTop(centerCircle, (HEIGHT / 2) - (centerCircle.Height / 2)); 
                ClockArea.Children.Add(centerCircle); 
            } 
     
            // Draw Clock Face 
            public void DrawClockFace() 
            { 
                         
                int smallCircle = 5; 
     
                Color c = Colors.Blue; 
                int p = 0; 
     
                // Draw Shadow of Outer Circle 
                Ellipse outerCircleShadow = new Ellipse() 
                { 
                    Width = (WIDTH), 
                    Height = (WIDTH), 
                    Stroke = new SolidColorBrush(Colors.Gray), 
                    StrokeThickness = 5, 
                    HorizontalAlignment = HorizontalAlignment.Center, 
                    VerticalAlignment = VerticalAlignment.Center 
                     
                }; 
                
                outerCircleShadow.SetValue(Grid.RowProperty, 0); 
                outerCircleShadow.SetValue(Grid.ColumnProperty, 0); 
                Canvas.SetLeft(outerCircleShadow, (WIDTH / 2) - (outerCircleShadow.Width / 2) + 6.5); 
                Canvas.SetTop(outerCircleShadow, (HEIGHT / 2) - (outerCircleShadow.Height / 2) + 6.5); 
                ClockArea.Children.Add(outerCircleShadow); 
                
                //  Draw Outer Circle 
                outerCircle = new Ellipse() 
                { 
                    Width = (WIDTH ), 
                    Height = (WIDTH), 
                    Stroke = new SolidColorBrush(Colors.Black), 
                    StrokeThickness = 5, 
                    HorizontalAlignment = HorizontalAlignment.Center, 
                    VerticalAlignment = VerticalAlignment.Center 
                };             
                outerCircle.SetValue(Grid.RowProperty, 0); 
                outerCircle.SetValue(Grid.ColumnProperty, 0); 
                Canvas.SetLeft(outerCircle, (WIDTH / 2) - (outerCircle.Width / 2) + 4.5); 
                Canvas.SetTop(outerCircle, (HEIGHT / 2) - (outerCircle.Height / 2) + 4.5); 
                ClockArea.Children.Add(outerCircle); 
     
     
                outerCircle.Fill = new LinearGradientBrush() 
                    { 
                        EndPoint = new Point(1, 0), 
                        GradientStops = new GradientStopCollection() 
                        { 
                                new GradientStop() { Color = Colors.White, Offset = 0 }, 
                                new GradientStop() { Color = Colors.Gray, Offset = 0.5 }, 
                                 new GradientStop() { Color = Colors.White, Offset = 1 } 
                        } 
                    }; 
     
                int clockDigits = 3; 
                double rad = (WIDTH/2) - 10.0f; 
                // 60 Innner Dots as Small Circle 
                for (double i = 0.0; i < 360.0; i += 6)  
                {  
     
                double angle = i * System.Math.PI / 180; 
     
                int x = (int)(centerPoint.X + rad * System.Math.Cos(angle)); 
                int y = (int)(centerPoint.Y + rad * System.Math.Sin(angle)); 
     
                if (p % 5 == 0) 
                { 
                    smallCircle = 10; 
                    c = Colors.Orange;                 
                } 
                else 
                { 
                    smallCircle = 5; 
                    c = Colors.Blue; 
                } 
                if (p % 15 == 0) 
                { 
                    TextBlock tb = new TextBlock(); 
                    tb.Text = clockDigits.ToString(); 
                    tb.FontSize = 24; 
                     
                    tb.SetValue(Grid.RowProperty, 0); 
                    tb.SetValue(Grid.ColumnProperty, 0); 
                    Canvas.SetLeft(tb, x ); 
                    Canvas.SetTop(tb, y); 
                    if (clockDigits == 3) 
                    { 
                        Canvas.SetLeft(tb, x - 20); 
                        Canvas.SetTop(tb, y - 10); 
                    } 
                    if (clockDigits == 6) 
                    { 
                        Canvas.SetLeft(tb, x); 
                        Canvas.SetTop(tb, y - 30); 
                    } 
                    if (clockDigits == 9) 
                    { 
                        Canvas.SetLeft(tb, x + 15); 
                        Canvas.SetTop(tb, y - 10); 
                    } 
                    if (clockDigits == 12) 
                    { 
                        Canvas.SetLeft(tb, x - 10); 
                        Canvas.SetTop(tb, y + 5 ); 
                    }  
                   
                     
                    ClockArea.Children.Add(tb); 
                    clockDigits = clockDigits + 3; 
                } 
     
                p++; 
                
                            Ellipse innerPoints = new Ellipse() 
                            { 
                                Width = smallCircle, 
                                Height = smallCircle, 
                                Stroke = new SolidColorBrush(c), 
                                Fill = new SolidColorBrush(c), 
                                HorizontalAlignment = HorizontalAlignment.Center, 
                                VerticalAlignment = VerticalAlignment.Center 
                            }; 
                            innerPoints.SetValue(Grid.RowProperty, 0); 
                            innerPoints.SetValue(Grid.ColumnProperty, 0); 
                            Canvas.SetLeft(innerPoints, x); 
                            Canvas.SetTop(innerPoints, y); 
                            ClockArea.Children.Add(innerPoints); 
     
                } 
     
                 
            } 
            // Draw the Second Hand 
            public void DrawSecondHand() 
            { 
     
                double handLength = (HEIGHT / 2) - 20; 
                secondHand = new Rectangle() 
                { 
                    Width = 1, 
                    Height = handLength, 
                    Stroke = new SolidColorBrush(Colors.Red), 
                    Fill = new SolidColorBrush(Colors.Red), 
                    HorizontalAlignment = HorizontalAlignment.Center, 
                    VerticalAlignment = VerticalAlignment.Center 
                }; 
                 
                secondHand.SetValue(Grid.RowProperty, 0); 
                secondHand.SetValue(Grid.ColumnProperty, 0); 
                //Add Rotate Transformation 
                secondHandRotate = new RotateTransform(); 
                secondHandRotate.Angle = 0; 
                //Set Center for Rotation 
                secondHandRotate.CenterX = Canvas.GetLeft(secondHand); 
                secondHandRotate.CenterY = secondHand.Height; 
                secondHand.RenderTransform = secondHandRotate; 
                //Set Initial Position of Hand 
                Canvas.SetTop(secondHand, centerPoint.Y - handLength); 
                Canvas.SetLeft(secondHand, WIDTH/2);            
                ClockArea.Children.Add(secondHand); 
                
            } 
     
            public void DrawMinuteHand() 
            { 
                double handLength = (HEIGHT / 2) - 50; 
                minuteHand = new Rectangle() 
                { 
                    Width = 4, 
                    Height = handLength, 
                    Stroke = new SolidColorBrush(Colors.Black), 
                    Fill = new SolidColorBrush(Colors.Black), 
                    HorizontalAlignment = HorizontalAlignment.Center, 
                    VerticalAlignment = VerticalAlignment.Center 
                }; 
     
                minuteHand.SetValue(Grid.RowProperty, 0); 
                minuteHand.SetValue(Grid.ColumnProperty, 0); 
     
                minuteHandRotate = new RotateTransform(); 
                minuteHandRotate.Angle = 0; 
                minuteHandRotate.CenterX = Canvas.GetLeft(minuteHand); 
                minuteHandRotate.CenterY = minuteHand.Height; 
                minuteHand.RenderTransform = minuteHandRotate; 
                Canvas.SetTop(minuteHand, centerPoint.Y - handLength); 
                Canvas.SetLeft(minuteHand, WIDTH / 2); 
                ClockArea.Children.Add(minuteHand); 
     
            } 
            public void DrawHourHand() 
            { 
                double handLength = (HEIGHT / 2) - 80; 
                hourHand = new Rectangle() 
                { 
                    Width = 4, 
                    Height = handLength, 
                    Stroke = new SolidColorBrush(Colors.Black), 
                    Fill = new SolidColorBrush(Colors.Black), 
                    HorizontalAlignment = HorizontalAlignment.Center, 
                    VerticalAlignment = VerticalAlignment.Center 
                }; 
     
                hourHand.SetValue(Grid.RowProperty, 0); 
                hourHand.SetValue(Grid.ColumnProperty, 0); 
     
                hourHandRotate = new RotateTransform(); 
                hourHandRotate.Angle = 0; 
                hourHandRotate.CenterX = Canvas.GetLeft(hourHand); 
                hourHandRotate.CenterY = hourHand.Height; 
                hourHand.RenderTransform = hourHandRotate; 
                Canvas.SetTop(hourHand, centerPoint.Y - handLength); 
                Canvas.SetLeft(hourHand, WIDTH / 2);    
                ClockArea.Children.Add(hourHand); 
     
            } 
     
        } 
    } 


The Output

Now execute and you will get a fully drawn Silverlight Analog Clock.


HostForLIFE.eu Silverlight 6 Hosting
HostForLIFE.eu is European Windows Hosting Provider which focuses on Windows Platform only. We deliver on-demand hosting solutions including Shared hosting, Reseller Hosting, Cloud Hosting, Dedicated Servers, and IT as a Service for companies of all sizes. We have customers from around the globe, spread across every continent. We serve the hosting needs of the business and professional, government and nonprofit, entertainment and personal use market segments.


Silverlight 6 Hosting UK - HostForLIFE.eu :: How to Use Silverlight Storyboard to Create Busy Indicator Bar

clock August 4, 2015 07:14 by author Rebecca

The Silverlight toolkit comes with Busy Indicator control, but some time you may need to develop custom Busy Indicator for your application. Here are the steps to create Busy Indicator using Silverlight StoryBoard.

Step 1: Create Silverlight Application

Create Silverlight application and add ProgressBar.xaml user control in your project.

Step 2: Code Progress Bar

Copy and paste below given code ten times and change grid name from circle0 through circle9. This code will be used to generate small filled circles.

<Grid x:Name="circle0" HorizontalAlignment="Center" Margin="0,0,0,0"
                    VerticalAlignment="Center" Opacity="0" RenderTransformOrigin="0.5,0.5">
     <Grid.RenderTransform>
          <TransformGroup>
            <ScaleTransform />
                  <SkewTransform />
                  <RotateTransform />
                  <TranslateTransform X="29" Y="-44" />
          </TransformGroup>
      </Grid.RenderTransform>
      <Ellipse HorizontalAlignment="Center" Margin="0,0,0,0" Width="10"
               RenderTransformOrigin="0.5,0.5" Stroke="{x:Null}" Height="10"
                        VerticalAlignment="Center">
          <Ellipse.Fill>
                   <RadialGradientBrush>
                   <GradientStop Color="#FF000000" />
                   <GradientStop Color="#00000000" Offset="1" />
                   <GradientStop Color="#7F000000" Offset="0.551" />
                   </RadialGradientBrush>
          </Ellipse.Fill>
          <Ellipse.RenderTransform>
                   <TransformGroup>
                   <ScaleTransform />
                   <SkewTransform />
                   <RotateTransform />
                   <TranslateTransform X="2" Y="2" />
                   </TransformGroup>
          </Ellipse.RenderTransform>
       </Ellipse>
       <Ellipse Height="9" HorizontalAlignment="Center" Margin="0,0,0,0"
            Width="9" RenderTransformOrigin="0.5,0.5"   VerticalAlignment="Center" Stroke="{x:Null}">
          <Ellipse.Fill>
                   <LinearGradientBrush EndPoint="0.5,1" StartPoint="0.5,0">
                   <GradientStop Color="#FF9ED9E7" />
                   <GradientStop Color="#FF67BED9" Offset="1" />
                   </LinearGradientBrush>
          </Ellipse.Fill>
            <Ellipse.RenderTransform>
                  <TransformGroup>
                         <ScaleTransform />
                         <SkewTransform />
                         <RotateTransform />
                         <TranslateTransform X="0" Y="0" />
                  </TransformGroup>
            </Ellipse.RenderTransform>
          </Ellipse>
</Grid>

Step 3: Add  StoryBoard code

Add this StoryBoard in user control resources section. This will start Busy Indicator animation.

<Storyboard x:Name="StartAnimation">
            <DoubleAnimation Storyboard.TargetProperty="(UIElement.Opacity)"
                    Storyboard.TargetName="LayoutRoot" From="0" To="1" Duration="0:0:0.3">
            </DoubleAnimation>
</Storyboard>


Copy and paste below code ten times and change StoryBoard name from ProgressStoryboard0 through ProgressStoryboard9 and StoryBoard TargetName from circle0 through circle9 (you have already declared code for circles above). This code will be used to generate StoryBoard animation for Busy Indicator.

<Storyboard x:Name="ProgressStoryboard0">
            <DoubleAnimationUsingKeyFrames BeginTime="00:00:00" Storyboard.TargetName="circle0"
                    Storyboard.TargetProperty="(UIElement.Opacity)">
                <SplineDoubleKeyFrame KeyTime="00:00:00" Value="0" />
                <SplineDoubleKeyFrame KeyTime="00:00:00.0050000" Value="1" />
                <SplineDoubleKeyFrame KeySpline="0,0,0.601999998092651,0.400999993085861"
                        KeyTime="00:00:00.7000000" Value="1" />
                <SplineDoubleKeyFrame KeyTime="00:00:00.7120000" Value="0" />
            </DoubleAnimationUsingKeyFrames>
            <DoubleAnimationUsingKeyFrames BeginTime="00:00:00" Storyboard.TargetName="circle0"
                    Storyboard.TargetProperty="(UIElement.RenderTransform).(TransformGroup.Children)[0].(ScaleTransform.ScaleY)">
                <SplineDoubleKeyFrame KeyTime="00:00:00" Value="1" />
                <SplineDoubleKeyFrame KeyTime="00:00:00.0050000" Value="1" />
                <SplineDoubleKeyFrame KeySpline="0,0,0.601999998092651,0.400999993085861"
                        KeyTime="00:00:00.7000000" Value="0.3" />
                <SplineDoubleKeyFrame KeyTime="00:00:00.7120000" Value="0.30000001192092896" />
            </DoubleAnimationUsingKeyFrames>
            <DoubleAnimationUsingKeyFrames BeginTime="00:00:00" Storyboard.TargetName="circle0"
                    Storyboard.TargetProperty="(UIElement.RenderTransform).(TransformGroup.Children)[0].(ScaleTransform.ScaleX)">
                <SplineDoubleKeyFrame KeyTime="00:00:00" Value="1" />
                <SplineDoubleKeyFrame KeyTime="00:00:00.0050000" Value="1" />
                <SplineDoubleKeyFrame KeySpline="0,0,0.601999998092651,0.400999993085861"
                        KeyTime="00:00:00.7000000" Value="0.3" />
                <SplineDoubleKeyFrame KeyTime="00:00:00.7120000" Value="0.30000001192092896" />
            </DoubleAnimationUsingKeyFrames>
</Storyboard>

Step 4: Add animation start and stop code

Add below code in your ProgressBar.xaml.cs file. This has a dependency property IsActive. When IsActive is set to true the Busy Indicator animation will start and when it is set to false the animation will be stopped.

public partial class ProgressBar : UserControl
{
    private Storyboard storyBoard;
    private List<Storyboard> storyBoardList;
    private int nextStoryBoard;
    public static readonly DependencyProperty IsActiveProperty =
            DependencyProperty.Register("IsActive", typeof(bool), typeof(ProgressBar), new PropertyMetadata(IsActivePropertyChanged));
    public ProgressBar()
    {
          InitializeComponent();
          this.storyBoard = new Storyboard()
          {
                   Duration = new Duration(TimeSpan.FromMilliseconds(100))
          };
           this.storyBoard.Completed += new EventHandler(this.OnIntervalTimerCompleted);
           this.storyBoardList = new List<Storyboard>()
          {
                   ProgressStoryboard0,
                   ProgressStoryboard1,
                   ProgressStoryboard2,
                   ProgressStoryboard3,
                   ProgressStoryboard4,
                   ProgressStoryboard5,
                   ProgressStoryboard6,
                   ProgressStoryboard7,
                   ProgressStoryboard8,
                   ProgressStoryboard9
          };
    }
    public bool IsActive
    {
        get { return (bool)GetValue(IsActiveProperty); }
        set { SetValue(IsActiveProperty, value); }
    }
    private static void IsActivePropertyChanged(DependencyObject sender, DependencyPropertyChangedEventArgs e)
    {
        var spinControl = sender as ProgressBar;
        if (spinControl != null)
        {
            if ((bool)e.NewValue)
           {
               spinControl.Start();
          }
          else
          {
              spinControl.Stop();
          }
        }
    }
    private void Start()
    {
        this.Visibility = Visibility.Visible;
        StartAnimation.Begin();
        this.storyBoard.Begin();
    }
    private void Stop()
    {
        this.Visibility = Visibility.Collapsed;
        StartAnimation.Stop();
        this.nextStoryBoard = 0;
        this.storyBoard.Stop();
        foreach (var item in this.storyBoardList)
        {
            item.Stop();
        }
    }
    private void OnIntervalTimerCompleted(object sender, EventArgs e)
    {
        this.storyBoardList[nextStoryBoard].Begin();
        this.nextStoryBoard = this.nextStoryBoard > 8 ? 0 : this.nextStoryBoard + 1;
        this.storyBoard.Begin();
    }
}

At this point you have completed coding for BusyIndicator control. Now the next step is implementation to see how exactly it works.

Step 5: Implementing Busy Indicator

To implement and test the above mentioned Busy Indicator, I have added a simple WCF MathService which returns sum of two values supplied to its Add method. The main reason behind choosing WCF service for this example is, this is the most common scenario to implement Busy Indicator.  Add service reference of this service into Silverlight project.MainPage.xaml changes:
Add namespace for Busy Indicator in MainPage.xaml file.

xmlns:progressBar="clr-namespace:CustomProgressBar"

And add below code in the same file.

<Grid x:Name="LayoutRoot" Margin="20,20,20,20">
        <Grid Margin="5,5,5,5">
            <StackPanel HorizontalAlignment="Center">
                <TextBlock x:Name="lblResult" />
                <Button x:Name="btnAdd" Width="100" Content="Add" Click="btnAdd_Click" />
            </StackPanel>
        </Grid>
        <progressBar:ProgressBar x:Name="ProgressBar1" Visibility="Collapsed"/>
</Grid>

You can see in above code, I have placed custom Busy Indicator control in MainPage using below line of code.

<progressBar:ProgressBar x:Name="ProgressBar1" Visibility="Collapsed"/>

MainPage.xaml.cs change: Add below code in this file.

private void btnAdd_Click(object sender, RoutedEventArgs e)
{
    ProgressBar1.IsActive = true;
    MathService.MathServiceClient proxy = new CustomProgressBar.MathService.MathServiceClient();
    proxy.AddCompleted += new EventHandler<CustomProgressBar.MathService.AddCompletedEventArgs>(proxy_AddCompleted);
    proxy.AddAsync(10, 10);
}
void proxy_AddCompleted(object sender, CustomProgressBar.MathService.AddCompletedEventArgs e)
{
    lblResult.Text = e.Result.ToString();
    ProgressBar1.IsActive = false;
}

Here I have added a button with the name "Add", on click of this button I am calling MathService to calculate sum of two given numbers. Once the result is returned from MathService it will be displayed in TextBlock.  On button click event I am setting Progress Bar IsActive property to true, at this moment the Busy Indicator animation will start. And when the Add method completed event is called I am setting IsActive property value to false, to stop the animation.

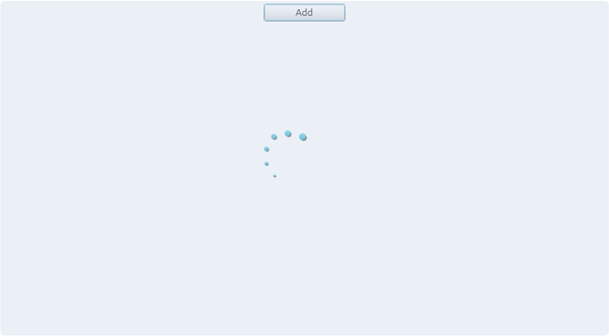
Step 6: Run the application

Once all the changes are completed run the application. You will see below screen when you click on "Add" button. The good thing is, until the Busy Indicator runs the UI portion of the application will be locked and once the processing is completed screen will be unlocked again.

HostForLIFE.eu Silverlight 6 Hosting
HostForLIFE.eu is European Windows Hosting Provider which focuses on Windows Platform only. We deliver on-demand hosting solutions including Shared hosting, Reseller Hosting, Cloud Hosting, Dedicated Servers, and IT as a Service for companies of all sizes. We have customers from around the globe, spread across every continent. We serve the hosting needs of the business and professional, government and nonprofit, entertainment and personal use market segments.


Silverlight 6 Hosting Romania - HostForLIFE.eu :: How to Create Storyboard Animation using Expression Blend in Silverlight

clock June 30, 2015 06:11 by author Rebecca

There are two ways to animate in Silverlight, through storyboards and through code. Expression Blend offers extensive help in creating storyboard animations. Silverlight animation is time based not frame based, this means that your animation will benefit from running at the maximum frame rate that the users machine will allow. Multiple storyboards can be created and run at the same time, but for the purpose of this basic tutorial, you'll be shown how to create a single storyboard.

Follow these simple steps to create storyboard animation using expression blend in Silverlight:

Step 1

To create a new storyboard, go to the Objects and Timeline tab then click on the ‘plus’ icon.

If you are using the default UI layout in Blend, you may want to hit the ‘F6‘ key to switch the layout from design mode to animation mode, this will give you a better layout for working with storyboards.

Notice that after adding a storyboard a red circle will be displayed in the top right of the screen, this indicates that you are in record mode. When in record mode, every change you make is treated as an animation and will be tied to a Keyframe. To turn record mode on or off click on the red circle in the top right of the screen, it should toggle from red to grey.

Step 2

For the purpose of this tutorial I have created a ball graphic and a shadow graphic as shown below. You can use any objects thay you like to make your own animation project.  I have placed them off the page to the left so that they start out of site.

Step 3

Storyboard animation is based on Keyframes set to specific times. To add a Keyframe, go back to the ‘Objects and Timeline‘ tab, select the objects that you want to animate and click the Record Keyframe button as highlighted below. You will see that a new Keyframe is added by each object at zero seconds.

Step 4

To add a Keyframe at a specific point along your timeline, drag the yellow time bar to the required point and then hit the Record Keyframe button. To make our ball graphic animate I have selected a time stamp of 0.5 seconds and moved the ball to the position shown below:

Step 5

Then you can animate the ball and shadow graphics again at 1 second.

And once more at 1.5 seconds to finish the animation.

Step 6

Now that we have completed the animation we may want to loop it multiple times or loop it forever. To make the animation loop, make sure you have the storyboard selected under the ‘Objects and Timeline‘ tab, then go to your ‘Properties‘ tab and scroll down to the ‘Common Properties‘ section. Here you have an option to repeat the animation several times, for this tutorial, you have to set it to ‘Forever‘.

Step 7

Finally, you need to tell the storyboard to play. Sometimes you will need a storyboard to be called by the code behind file, but you can use ‘Behaviors’ to start a storyboard instead. ‘Behaviors’ are pre-set actions that can be dropped onto objects in Blend, they are an easy way to achieve functionality without requiring knowledge of C# or alternative languages. To tell the storyboard to autoplay, go to the ‘Assets‘ button on the main tool bar (the last icon), select ‘Behaviors‘ from the list on the left to bring up the selection of behaviors. Find the behavior titled ‘ControlStoryboardAction‘ and drag it onto your ‘LayoutRoot‘. See how the behavior is indented below the ‘LayoutRoot‘. Select the behavior and go to the ‘Properties‘ tab, scroll down to the ‘Triggers‘ section and set the following settings:

EventName = Loaded

ControlStoryboard… = Play

Storyboard = Storyboard1 (the name of your storyboard)

You are done with your storyboard animation!

HostForLIFE.eu Silverlight 6 Hosting
HostForLIFE.eu is European Windows Hosting Provider which focuses on Windows Platform only. We deliver on-demand hosting solutions including Shared hosting, Reseller Hosting, Cloud Hosting, Dedicated Servers, and IT as a Service for companies of all sizes. We have customers from around the globe, spread across every continent. We serve the hosting needs of the business and professional, government and nonprofit, entertainment and personal use market segments.


Silverlight with Free ASP.NET Hosting - HostForLIFE.eu :: How to Make Silverlight Overlay Notification

clock April 22, 2015 07:01 by author Rebecca

Most of us do not like applications that continuosly bothering with popup messages to make us aware that something happened. Sometimes, a message box coming up saying "Changes were saved succesfully" right after pressing the save button, this condition is so bothering because our work can be interrupted by the unimportant notification box. Maybe, we better would like to be told that it worked if it allows us to keep going or you'd better be told if something went wrong.

For example, during Christmas a lot of messages full of best wishes are going around. You can sent one of those to one friend and after a while an Overlay Notification appeared at the bottom of your screen saying "Message received by [contact]". So, in this post, I will tell you how to make that kind of notification in Silverlight which isn't keep bothering you while you were working on something.

Step 1

First, let us create a User Control. The control will be the already mentioned Overlay Notification. You canl make it appear and disappear after a while without user interaction. This could be the XAML code:

 <UserControl x:Class="SilverlightTestApp.Controls.OverlayNotification"
    xmlns="http://schemas.microsoft.com/winfx/2006/xaml/presentation"
    xmlns:x="http://schemas.microsoft.com/winfx/2006/xaml"
    xmlns:d="http://schemas.microsoft.com/expression/blend/2008"
    xmlns:mc="http://schemas.openxmlformats.org/markup-compatibility/2006"
    mc:Ignorable="d">
   
    <UserControl.Resources>
        <Storyboard x:Name="ShowMessage" Completed="ShowMessage_Completed">
            <DoubleAnimation
            Duration="00:00:06"
            From="0.00"
            To="1.00"
            AutoReverse="True"
            Storyboard.TargetName="Popup"
            Storyboard.TargetProperty="Opacity"/>           
        </Storyboard>       
    </UserControl.Resources>
   
    <Grid x:Name="LayoutRoot" Background="White" HorizontalAlignment="Center" >
        <Border BorderBrush="Black" BorderThickness="1" MinWidth="150" MaxWidth="550" MaxHeight="75"
                   CornerRadius="4" Background="Transparent" Visibility="Collapsed" Opacity="0" x:Name="Popup">
            <TextBlock x:Name="lblMessage" HorizontalAlignment="Center" TextWrapping="Wrap" MaxWidth="400" MaxHeight="75"></TextBlock>
        </Border>
    </Grid>   

</UserControl>

Step 2

You have a Storyboard that will be triggered whenever you want to show the Notification. It will last 6 seconds (plus another 6 because of the AutoReverse=true). And will change the Opacity of our notification area to give the impression that it fades in and out.

Then you already had a Border with rounded corners. You'll have to make it visible whenever you want to show the message and hide it when the Storyboard is done. Inside of this Border, you will have a Textblock where your message will be displayed.

Let's take a look at the code behind:

using System.Windows;
using System.Windows.Controls;
using System.Windows.Media;

namespace SilverlightTestApp.Controls
{
    public partial class OverlayNotification : UserControl
    {
        private string _message;
        public string Message
        {
            get
            {
                return _message;
            }
            set
            {
                _message = value;
                lblMessage.Text = value;
                Popup.Visibility = Visibility.Visible;
                ShowMessage.Begin();
            }
        }

        private System.Windows.Media.Color _color;
        public System.Windows.Media.Color Color
        {
            get
            {
                return _color;
            }
            set
            {
                _color = value;
                var newBrush = new SolidColorBrush();
                newBrush.Color = value;
                lblMessage.Foreground = newBrush;
            }
        }

        public OverlayNotification()
        {
            InitializeComponent();
        }

        private void ShowMessage_Completed(object sender, System.EventArgs e)
        {
            Popup.Visibility = Visibility.Collapsed;
        }
    }
}

You will expose at least the Message property (you also have the Color property for the font). Notice that everytime you set the Message property we update the Textblock's text, make the Border visible and trigger the Storyboard. Also noticed that you can handle the Storyboard's completed event to hide the Border.

To use it, just add this new User Control into the view where you want to use it in the same way that you would place a Textbox or any other control:

<my:OverlayNotification x:Name="myOverlayNotification"/>

Then, whenever you want to show a Notification, just set the Message property with the message you want to display:

 myOverlayNotification.Color = Colors.Red;
 myOverlayNotification.Message = "This is a test notification";

Feel free to play around with it modifying the layout and appeareance of the control in the XAML or adding more properties to be able to customize it more, for example, adding a BackgroundColor property.

Silverlight 6 with Free ASP.NET Hosting
Try our Silverlight 6 with Free ASP.NET Hosting today and your account will be setup soon! You can also take advantage of our Windows & ASP.NET Hosting support with Unlimited Domain, Unlimited Bandwidth, Unlimited Disk Space, etc. You will not be charged a cent for trying our service. Once your trial period is complete, you decide whether you'd like to continue.


Silverlight with Free ASP.NET Hosting - HostForLIFE.eu :: How to Create Simple Navigation in Silverlight ?

clock April 21, 2015 08:08 by author Peter

Navigation Framework is absolutely good however in some cases we have a tendency to don't need to use the Navigation Framework. This navigation technique may be used instead that provides simple Navigation. Add the following code in App.xaml:

private static Grid root    
public static void Navigate(UserControl newPage)
{
UserControl oldPage = root.Children[0] as UserControl;
root.Children.Add(newPage);
root.Children.Remove(oldPage);
}

Now, Edit the App.xaml as shown below:
Previous code: 
private void Application_Startup(object sender, StartupEventArgs e)
{
 this.RootVisual = new MainPage();
 }

Modified code:

private void Application_Startup(object sender, StartupEventArgs e)
{
root = new Grid();
root.Children.Add(new MainPage());
this.RootVisual = root;     
}


Create a new usercontrol NewPage . Add Button to the Page inorder to navigate to the home. equally produce a button within the MainPage.xaml as well inorder to navigate to the NewPage. within the Button Click event add the following code:
       App app = (App)Application.Current;
        App.Navigate(new NewPage());


Application.Current gets the System.Windows.Application object for this application. The new instance of the Page is passed to the Navigate method of App class. When we run the code we are able to navigate between the MainPage and also the NewPage.xaml.


Silverlight 6 with Free ASP.NET Hosting

Try our Silverlight 6 with Free ASP.NET Hosting today and your account will be setup soon! You can also take advantage of our Windows & ASP.NET Hosting support with Unlimited Domain, Unlimited Bandwidth, Unlimited Disk Space, etc. You will not be charged a cent for trying our service. Once your trial period is complete, you decide whether you'd like to continue.


Silverlight 6 with Free ASP.NET Hosting - HostForLIFE.eu :: How to Create a Progress Bar while Uploading File

clock April 15, 2015 06:04 by author Rebecca

When you worked with Silverlight to create an GUI to let the user to upload the file, it is important to create a progress bar to make the user aware of the uploading progress.Today, I will show you how to create a progress bar while uploading a file.

Here is the sample of the progress bar that I've created:

Several resources can be obtained online, but the explaination is either not clear enough, or there are redundant codes confusing people. Here, the code is as simplest as possible, with the assumption that,
a) there is no connection lost between the client and the server during the process
b) there is no data corrupted during the transmission
c) small file size (can be edited)

Before we go with code, first you can observe that there are 4 UI components:
a) Browser button
b) Textbox shows file name (can be disabled)
c) Upload button
d) Progress bar + labels

Browser Button

Here's the code to create the browser button:

    OpenFileDialog dialog = new OpenFileDialog(); //OpenFileDialog will open a file dialog which allows the use to browser the wanted file.
    if ((bool)dialog.ShowDialog())
    {
          globalFileStream = dialog.File.OpenRead();
          ....
          ....
    }

Upload Button

An always updating progress bar means that, the upload progress has to be done 'Chunk' by 'Chunk'. To achieve this, we read the file stream 'Chunk' by 'Chunk and upload it.

Step 1 : Send First Chunck

    int steps = (int)(fileLength / (long)CHUNK_SIZE);
    progressBar1.Minimum = 0;               //set prograssbar info
    progressBar1.Maximum = steps;
    int read = 0;
    byte[] buffer = null;                                                                //buffer to store the file stream chunk by chunk
    if (globalFileStream.Length <= CHUNK_SIZE)                            //consider if the file size is smaller than the predefined chunk size
    {
          buffer = new byte[(int)globalFileStream.Length];
    }
    else
    {
          buffer = new byte[CHUNK_SIZE];
    }
    read = globalFileStream.Read(buffer, 0, buffer.Length);
    filePosition += read;
    myUpload.BeginUploadAsync(fileName, destinationFolder, buffer);       //begin upload the first chunk

Step 2: Sends second and subsequent chunk

    UpdateProgressBar(); //Update progress bar
    if (filePosition < fileLength)
    {
         int read = 0;
         int readSize = CHUNK_SIZE;
         byte[] buffer = null;
         long diff = fileLength - filePosition;
         if (diff < CHUNK_SIZE)
         {
               readSize = (int)diff;
         }
         buffer = new byte[readSize];
         globalFileStream.Seek(filePosition, SeekOrigin.Begin);
         read = globalFileStream.Read(buffer, 0, readSize);
         filePosition += read;
         myUpload.ContinueUploadAsync(theFileName, "here", buffer);

For your information, progress bar provided by Silverlight doesn't have the percentage displayed. Hence, I additionally put a label on top of the progress bar. The label contents are the percentage of the file stream sent to the server.

Silverlight 6 with Free ASP.NET Hosting
Try our Silverlight 6 with Free ASP.NET Hosting today and your account will be setup soon! You can also take advantage of our Windows & ASP.NET Hosting support with Unlimited Domain, Unlimited Bandwidth, Unlimited Disk Space, etc. You will not be charged a cent for trying our service for the next 3 days. Once your trial period is complete, you decide whether you'd like to continue.


Silverlight 6 with Free ASP.NET Hosting - HostForLIFE.eu :: How to Align Text in DataGrid Cell in Xaml and in Code Behind ?

clock April 14, 2015 07:46 by author Peter

Hi friends, in this short article I will tell you about How to Align Text in DataGrid Cell in Xaml and in Code Behind with Silverlight 6. First, take a look the following code:

DataGridTextColumn textColumn = new DataGridTextColumn();
textColumn.Header = "Result";
textColumn.Binding = new Binding("Result");
dataGrid1.Columns.Add(textColumn);

How I will set RESULT alignment right? Here is what you've got to try to to, I'll show you this in each ways that like doing it in Xaml Page and doing it in code behind. First add the style in your User control Resource:
<UserControl.Resources>
      <Style x:Key="AlignRight" TargetType="Data:DataGridCell">
          <Setter Property="HorizontalContentAlignment" Value="Right" />
     </Style>
</UserControl.Resources>

I'm doing this for Right Align however you'll be able to change it in keeping with your requirement. Next, the way to do this in Xaml Page? Its terribly straightforward, apply this style to whichever column you would like, like this:

<Data:DataGridTextColumn Header="Amount" Width="90" Binding="{Binding Amount}" IsReadOnly="True" CellStyle="{StaticResource AlignRight}"></Data:DataGridTextColumn>

Now how to do this in code behind:
DataGridTextColumn textColumn = new DataGridTextColumn();
textColumn.Header = "Result";
textColumn.Binding = new Binding("Result");
textColumn.CellStyle = Resources["AlignRight"] as Style;
dataGrid1.Columns.Add(textColumn);

Hope it works for you!

Silverlight 6 with Free ASP.NET Hosting

Try our Silverlight 6 with Free ASP.NET Hosting today and your account will be setup soon! You can also take advantage of our Windows & ASP.NET Hosting support with Unlimited Domain, Unlimited Bandwidth, Unlimited Disk Space, etc. You will not be charged a cent for trying our service for the next 3 days. Once your trial period is complete, you decide whether you'd like to continue.


Silverlight 5 Hosting Germany - HostForLIFE.eu :: How to Get and Set the Control's Coordinate

clock April 11, 2015 06:48 by author Rebecca

Unlike normal C#, in Silverlight, you cannot access a control's coordinate through the object.Location.X and object.Location.Y. Instead, it is more troublesome to get and set the values. An in this article, I'm gonna tell you how to get and set the control's coordinate/location/position.

For example, if you want to add Label on the GUI through the code instead of XAML, you need to do have the following codes:

          Label[] arrayScores = new Label[MAX_PLAYERS]; //MAX_PLAYERS = 4
          for (int i = 0; i < arrayScores.Length; i++)
                {
                    arrayScores[i] = new Label();
                    arrayScores[i].Name = "Scores" + i;
                    arrayScores[i].Width = 50;
                    arrayScores[i].Height = 30;
                }

But that's not nough, you haven't set the coordinates of the Labels. You might think that adding the remaining codes at anywhere can do the job. However, it does not. Remember to put the coordinates setting code AFTER the page is loaded.

1. Add this.Loaded event in the constructor after the InitializeComponent()

    public MainPage()
            {
                InitializeComponent();
                ...
                ...
                this.Loaded += new RoutedEventHandler(MainPage_Loaded);
            }

2. Set coordinates using CANVAS: set position, then add into canvas.


            void MainPage_Loaded(object sender, RoutedEventArgs e)
            {
                Canvas.SetLeft(arrayScores[0], SCORE_OFFSET_LEFT);
                Canvas.SetLeft(arrayScores[1], SCORE_OFFSET_LEFT);
                Canvas.SetLeft(arrayScores[2], SCORE_OFFSET_LEFT);
                Canvas.SetLeft(arrayScores[3], SCORE_OFFSET_LEFT);
                canvas1.Children.Add(arrayScores[0]);
                canvas2.Children.Add(arrayScores[1]);
                canvas3.Children.Add(arrayScores[2]);
                canvas4.Children.Add(arrayScores[3]);
            }

Happy coding!

HostForLIFE.eu Silverlight 5 Hosting
HostForLIFE.eu is European Windows Hosting Provider which focuses on Windows Platform only. We deliver on-demand hosting solutions including Shared hosting, Reseller Hosting, Cloud Hosting, Dedicated Servers, and IT as a Service for companies of all sizes. We have customers from around the globe, spread across every continent. We serve the hosting needs of the business and professional, government and nonprofit, entertainment and personal use market segments.


About HostForLIFE

HostForLIFE is European Windows Hosting Provider which focuses on Windows Platform only. We deliver on-demand hosting solutions including Shared hosting, Reseller Hosting, Cloud Hosting, Dedicated Servers, and IT as a Service for companies of all sizes.

We have offered the latest Windows 2019 Hosting, ASP.NET 5 Hosting, ASP.NET MVC 6 Hosting and SQL 2019 Hosting.


Tag cloud

Sign in