
September 3, 2021 08:41 by
 Peter
PeterMany times in interview one question commanly used that is Difference Between WPF and Silverlight and Advantages of WPF, so by considering above requirement i have decided to write this blog to help freshers and job seekers also who might be wants to know about it.

So let us see
Difference Between WPF And SilverLight:
- WPF is based off of the desktop CLR which is the full version of the CLR.
- Silverlight is based on a much smaller and more compact CLR which provides a great experience but does not have the full breadth
- of CLR features. It also has a much smaller version of the BCL
- WPF you can create Windows App, Navigation app and XBAP (IE based) applicationWith Silverlight you can create only XAP (Browser based application.).
- WPF supports 3 types of routed events (direct, bubbling, and tunneling). Silverlight supports direct and bubbling only.
- Silveright does not support MultiBinding.
- Silverlight supports the XmlDataProvider but not the ObjectDataProvider. WPF supports both.
Advantage of WPF:
Broad Integration: Prior to WPF, it was very difficult to use 3D, Video, Speech, and rich document viewing in addition to normal 2D Graphics and controls would have to learn several independent technologies. WPF covers all these with consisting programming model as well as tight integration when each type of media gets composited and rendered.
Resolution Independence: WPF applications are device independent i.e., smart client applications. Like normal applications it dont get decrease the size as the resolution gets increase. This is possible because WPF emphasis on vector graphics.
Hardware Acceleration: WPF is built on top of Direct 3D, content in a WPF application whether 2D or 3D, Graphics or text is converted to 3D triangles, textures and other Direct 3D objects and then rendered by hardware. WPF applications can get the benefit of hardware acceleration for smoother graphics and all round better performance.
Declerative Programming: WPF takes the declarative programming to the next level with the introduction of Extensible Application Markup Language(XAML)
XAML is like HTML in web used for creating the interface, resulting graphical designers are empowered to contribute directly to the look and feel of applications.
June 17, 2021 08:29 by
PeterSilverlight Rectangle Control
This article demonstrates how to create and use a Rectangle control in Silverlight using XAML and C#.
The Rectangle object represents a rectangle shape and draws a rectangle with the given height and width. The Width and Height properties of the Rectangle class represent the width and height of a rectangle. The Fill property fills the interior of a rectangle. The Stroke property sets the color and StrokeThickness represents the width of the outer line of a rectangle.
Creating a Rectangle
The Rectangle element represents a Silverlight Rectangle control in XAML.
<Rectangle/>
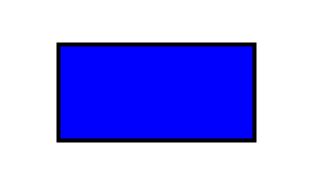
The code snippet in Listing 1 creates a rectangle by setting its width and height properties to 200 and 100 respectively. The code also sets the black stroke of width 4.
<Rectangle
Width="200"
Height="100"
Fill="Blue"
Stroke="Black"
StrokeThickness="4" />
The output
The CreateARectangle method listed in Listing 2 draws same rectangle in Figure 1 dynamically.
/// <summary>
/// Creates a blue rectangle with black border
/// </summary>
public void CreateARectangle()
{
// Create a Rectangle
Rectangle blueRectangle = new Rectangle();
blueRectangle.Height = 100;
blueRectangle.Width = 200;
// Create a blue and a black Brush
SolidColorBrush blueBrush = new SolidColorBrush();
blueBrush.Color = Colors.Blue;
SolidColorBrush blackBrush = new SolidColorBrush();
blackBrush.Color = Colors.Black;
// Set Rectangle's width and color
blueRectangle.StrokeThickness = 4;
blueRectangle.Stroke = blackBrush;
// Fill rectangle with blue color
blueRectangle.Fill = blueBrush;
// Add Rectangle to the Grid.
LayoutRoot.Children.Add(blueRectangle);
}
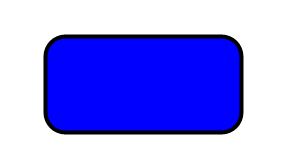
The RadiusX and RadiusY properties set the x-axis and y-axis radii of the ellipse that is used to round the corner of a rectangle. By adding the following lines of code to Listing 7 creates a rounded rectangle, which looks like Figure 2.
// Set roundness
blueRectangle.RadiusX = 20;
blueRectangle.RadiusY = 20;
Formatting a Rectangle
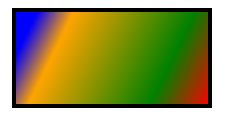
We can use the Fill property of the Rectangle to draw a rectangle with any kind of brush including a solid brush, linear gradient brush, radial gradient brush, or an image brush. The code in Listing 3 uses linear gradient brushes to draw the background and foreground of a Rectangle.
<Rectangle
Width="200"
Height="100"
Stroke="Black"
StrokeThickness="4" >
<Rectangle.Fill>
<LinearGradientBrush StartPoint="0,0" EndPoint="1,1" >
<GradientStop Color="Blue" Offset="0.1" />
<GradientStop Color="Orange" Offset="0.25" />
<GradientStop Color="Green" Offset="0.75" />
<GradientStop Color="Red" Offset="1.0" />
</LinearGradientBrush>
</Rectangle.Fill>
</Rectangle>
The new Rectangle looks like Figure 3.
Setting Image as Background of a Rectangle
To set an image as background of a Rectangle, we can set an image brush as the Fill of the Rectangle. The code in Listing 4 sets fills the rectangle with an image.
<Rectangle.Fill >
<ImageBrush ImageSource="dock.jpg" />
</Rectangle.Fill >
The new output looks like

Drawing a Semi-transparent Rectangle
The Opacity property represents the transparency of a Rectangle. The value of Opacity is between 0 and 1, where 0 is fully transparent and 1 is fully opaque. The code listed in Listing 5 generates a semi-transparent shape.
<Rectangle
Width="200"
Height="100"
Stroke="Black"
StrokeThickness="4"
Opacity="0.5">
The new output looks like

In this article, I discussed how we can create a Rectangle control in Silverlight at design-time using XAML and at run-time using C#. We also saw how we can format a Rectangle by setting its fill property. After that, we saw you to set an image as the background of a Rectangle. In the end, we saw how to draw a semi-transparent rectangle.
May 21, 2021 08:36 by
PeterA Simple Silverlight Application Implementing MVVM
MVVM
In simple words, View knows ViewModel, ViewModel knows Model, but not vice versa.
Why MVVM
Easy to unit test.
No need to change model to support changes in View.
Very minor changes required in ViewModel to support changes in View.
Separates UX designer and developer i.e the development team can focus on creating ViewModel classes, and the design team can focus on making user-friendly Views.
Simple Silverlight application using MVVM
Here I am just going to get a student name and age from the user and display the details in a GridView as in the figure.
The important areas covered are MVVM, using Relay Command and IValueConverter.
Creating a Student class
I created student class with the following properties, Name, Age, JoiningDate.
using System;
using System.Net;
using System.Windows;
using System.Windows.Controls;
using System.Windows.Documents;
using System.Windows.Ink;
using System.Windows.Input;
using System.Windows.Media;
using System.Windows.Media.Animation;
using System.Windows.Shapes;
namespace MVVMDemoinSL
{
public class Student
{
public string Name { get; set; }
public int Age { get; set; }
public DateTime JoiningDate { get; set; }
}
}
Creating ViewModelBase and ViewModel class
It's always a good idea to have a ViewModelBase class and inherit all the ViewModels from that. Hence we can reuse the code for implementing INotifyPropertyChanged.
The main purpose of using INotifyPropertyChanged is to get notification whenever the property value is changed.
I created a ViewModelBase as below.
using System;
using System.Net;
using System.Windows;
using System.Windows.Controls;
using System.Windows.Documents;
using System.Windows.Ink;
using System.Windows.Input;
using System.Windows.Media;
using System.Windows.Media.Animation;
using System.Windows.Shapes;
using System.ComponentModel;
namespace MVVMDemoinSL
{
public class ViewModelBase : INotifyPropertyChanged
{
public event PropertyChangedEventHandler PropertyChanged;
protected void NotifyPropertyChanged(string propertyName)
{
if (PropertyChanged != null)
{
PropertyChanged(this, new PropertyChangedEventArgs(propertyName));
}
}
}
}
I also created a ViewModel class which inherits from ViewModelBase.
using System;
using System.Net;
using System.Windows;
using System.Windows.Controls;
using System.Windows.Documents;
using System.Windows.Ink;
using System.Windows.Input;
using System.Windows.Media;
using System.Windows.Media.Animation;
using System.Windows.Shapes;
using System.Collections.ObjectModel;
namespace MVVMDemoinSL
{
public class ViewModel : ViewModelBase
{
private Student _student;
private ObservableCollection<Student> _students;
private ICommand _SubmitCommand;
public Student Student
{
get
{
return _student;
}
set
{
_student = value;
NotifyPropertyChanged("Student");
}
}
public ObservableCollection<Student> Students
{
get
{
return _students;
}
set
{
_students = value;
NotifyPropertyChanged("Students");
}
}
public ICommand SubmitCommand
{
get
{
if (_SubmitCommand == null)
{
_SubmitCommand = new RelayCommand(Submit);
}
return _SubmitCommand;
}
}
public ViewModel()
{
Student = new Student();
Students = new ObservableCollection<Student>();
Students.CollectionChanged += new System.Collections.Specialized.NotifyCollectionChangedEventHandler(Students_CollectionChanged);
}
//Whenever new item is added to the collection, am explicitly calling notify property changed
void Students_CollectionChanged(object sender, System.Collections.Specialized.NotifyCollectionChangedEventArgs e)
{
NotifyPropertyChanged("Students");
}
private void Submit()
{
Student.JoiningDate = DateTime.Today.Date;
Students.Add(Student);
Student = new Student();
}
}
}
RelayCommand
Since we are following the MVVM pattern, instead of having a Button click event in code behind, we are going to use the Command Property of the button. The RelayCommand allows you to inject the command's logic via delegates ed into its constructor. This approach allows for terse, concise command implementation in ViewModel classes. RelayCommand is a simplified variation of the DelegateCommand. RelayCommand implementation using CommandManager is not possible using Silverlight.
using System;
using System.Net;
using System.Windows;
using System.Windows.Controls;
using System.Windows.Documents;
using System.Windows.Ink;
using System.Windows.Input;
using System.Windows.Media;
using System.Windows.Media.Animation;
using System.Windows.Shapes;
namespace MVVMDemoinSL
{
public class RelayCommand : ICommand
{
private Func<bool> canExecute;
private Action executeAction;
public event EventHandler CanExecuteChanged;
public RelayCommand(Action executeAction,
Func<bool> canExecute)
{
this.executeAction = executeAction;
this.canExecute = canExecute;
}
public RelayCommand(Action executeAction)
| {
this.executeAction = executeAction;
this.canExecute = () => true;
}
public void RaiseCanExecuteChanged()
{
if (CanExecuteChanged != null)
{
CanExecuteChanged(this, EventArgs.Empty);
}
}
public bool CanExecute(object parameter)
{
return canExecute == null ? true : canExecute();
}
public void Execute(object parameter)
{
executeAction();
}
}
}
View
Now we have to create a view and bind it with ViewModel properties. The code for the view can be found below. I have used a window, Grid, Textbox, TextBlock, Button and GridView.
<UserControl x:Class="MVVMDemoinSL.MainPage"
xmlns="http://schemas.microsoft.com/winfx/2006/xaml/presentation"
xmlns:x="http://schemas.microsoft.com/winfx/2006/xaml"
xmlns:d="http://schemas.microsoft.com/expression/blend/2008"
xmlns:mc="http://schemas.openxmlformats.org/markup-compatibility/2006"
xmlns:sdk="http://schemas.microsoft.com/winfx/2006/xaml/presentation/sdk"
xmlns:viewmodel="clr-namespace:MVVMDemoinSL"
mc:Ignorable="d"
d:DesignHeight="300" d:DesignWidth="400">
<UserControl.Resources>
<viewmodel:ViewModel x:Key="ViewModel"/>
<viewmodel:DatetimeToDateConverter x:Key="MyConverter"/>
</UserControl.Resources>
<Grid DataContext="{Binding Source={StaticResource ViewModel}}">
<Grid.RowDefinitions>
<RowDefinition Height="Auto"/>
<RowDefinition Height="Auto"/>
<RowDefinition Height="Auto"/>
<RowDefinition Height="Auto"/>
<RowDefinition Height="*"/>
</Grid.RowDefinitions>
<Grid.ColumnDefinitions>
<ColumnDefinition Width="Auto"/>
<ColumnDefinition Width="*"/>
</Grid.ColumnDefinitions>
<TextBlock Grid.Row="0" Grid.Column="0" Text="Name" HorizontalAlignment="Center"/>
<TextBox Grid.Row="0" Grid.Column="1" Width="100" HorizontalAlignment="Center" Text="{Binding Student.Name, Mode=TwoWay}"/>
<TextBlock Grid.Row="1" Grid.Column="0" Text="Age" HorizontalAlignment="Center"/>
<TextBox Grid.Row="1" Grid.Column="1" Width="100" HorizontalAlignment="Center" Text="{Binding Student.Age, Mode=TwoWay}"/>
<Button Content="Submit" Command="{Binding SubmitCommand}" HorizontalAlignment="Right" Grid.Row="2" Grid.Column="0"/>
<sdk:DataGrid ItemsSource="{Binding Students}" Grid.Row="3" Grid.Column="0" Width="200" AutoGenerateColumns="False">
<sdk:DataGrid.Columns>
<sdk:DataGridTextColumn Header="Name" Binding="{Binding Name}" Width="60"/>
<sdk:DataGridTextColumn Header="Age" Binding="{Binding Age}" Width="60"/>
<sdk:DataGridTextColumn Header="Joining Date" Binding="{Binding JoiningDate, Converter={StaticResource MyConverter}}" Width="80" />
</sdk:DataGrid.Columns>
</sdk:DataGrid>
</Grid>
</UserControl>
If you see the above XAML code, you can see I am using Windows resources in my view. In resources, I am adding a reference to my ViewModel and DateTimeToDateConverter.
ValueConverter
We might often get some values from the property but we have to display some other value in the View. Say for example in my project, the Joining date is a date time value but I need to display only date. I can do this either by String format in binding or else ValueConverter. I just want to go with the latter one, since you can understand ValueConverter also.
using System;
using System.Net;
using System.Windows;
using System.Windows.Controls;
using System.Windows.Documents;
using System.Windows.Ink;
using System.Windows.Input;
using System.Windows.Media;
using System.Windows.Media.Animation;
using System.Windows.Shapes;
using System.Windows.Data;
using System.Globalization;
namespace MVVMDemoinSL
{
public class DatetimeToDateConverter : IValueConverter
{
public object Convert(object value, Type targetType, object parameter, CultureInfo culture)
{
DateTime date = (DateTime)value;
return date.ToString("MM/d/yyyy");
}
public object ConvertBack(object value, Type targetType, object parameter, CultureInfo culture)
{
return value;
}
}
}
For implementing MVVM in WPF, please go through the following article.
April 23, 2021 10:40 by
PeterPop Up Control is a Visual Prompt Control provided in Silverlight. There are certain times when you need to really grab the user's attention. Maybe you need to display details about a critical error. Then you can just use this control. This visual prompt is designed to simulate a dialog box.
In our Sample Application we will just demonstrate how to use it.
Create a Silverlight Project
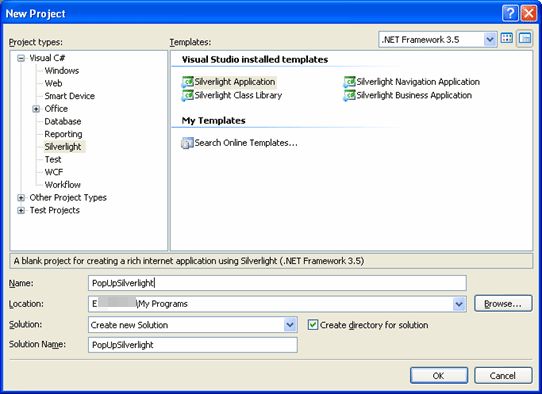
Figure 1.1 Creating Silverlight Project
Designing the Application
Here is an idea, we will add three images (ImageControls) to our application and on theirs LeftMouseButtonDown Event we will display the PopUp. So I have taken the help of Blend 3 to design the application. It will have 3 Images as Home, Search and Reports. The following figure displays our application.

Figure 1.2 Designing our Application
Adding a PopUp Control
This is actually disturbing; you can't find the control in the toolbox. But if you start typing the control name it will satisfy you. So I have added some controls like Border, StackPanel and Displaying Text and Button to close the PupUp.
<Popup x:Name="myPopup" Margin="-34,0,-31,0" Grid.Row="2" Grid.Column="1" Height="78" VerticalAlignment="Bottom" > <Border CornerRadius="10" Background="Silver" BorderThickness="2" BorderBrush="Black">
<StackPanel Margin="10">
<TextBlock x:Name="PopUpText"/>
<Button x:Name="PopUpButton" Height="30" Width="90" Content="Close" Click="PopUpButton_Click" />
</StackPanel>
</Border>
</Popup>
PopUp Control has a unique property called IsOpen which returns a boolean value of either true or false. The default value is always false. With this concept in mind let's add some events and use this property to control the show of the PopUp.
Calling the PopUp Control
As we discussed earlier we can handle the display of the PopUp by using the property IsOpen. Now we will see how we have used in our sample application.
private void PopUpButton_Click(object sender, RoutedEventArgs e)
{
myPopup.IsOpen = false;
}
private void Home_MouseLeftButtonDown(object sender, MouseButtonEventArgs e)
{
PopUpText.Text = "You Clicked Home";
myPopup.IsOpen = true;
}
private void Search_MouseLeftButtonDown(object sender, MouseButtonEventArgs e)
{
PopUpText.Text = "You Clicked Search";
myPopup.IsOpen = true;
}
private void Reports_MouseLeftButtonDown(object sender, MouseButtonEventArgs e)
{
PopUpText.Text = "You Clicked Reports";
myPopup.IsOpen = true;
}
Running the Application
When you click different images you will be notified by the PopUp Control.
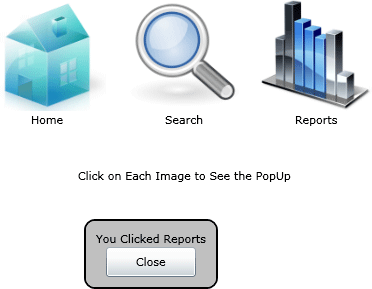
Figure 1.3 PopUp is displayed
That's it, we have successfully used the PopUp Control. Enjoy Coding.
December 18, 2020 08:25 by
PeterThe control that you just like drag or move with the mouse is embedded among a Border control then handle the mouse down, up and move events to create the object move among your layout panel.
See sample .xaml code:
<Canvas x:Name="LayoutRoot" Background="White">
<Border x:Name="border1"
Canvas.Top="100"
Canvas.Left="10"
MouseLeftButtonDown="border1_MouseLeftButtonDown"
MouseLeftButtonUp="border1_MouseLeftButtonUp"
MouseMove="border1_MouseMove">
<Image x:Name="MyImage" Source="images/Basket.png" Stretch="Uniform" ></Image>
</Border>
</Canvas>
In the above code, a Border control is placed within the Canvas. The foremost necessary code to notice is:
MouseLeftButtonDown="border1_MouseLeftButtonDown"
MouseLeftButtonUp="border1_MouseLeftButtonUp"
MouseMove="border1_MouseMove"
The above lines outline 3 events that we tend to like to handle. because the name indicates, we are handling the mouse button down, mouse button up and mouse move events for the left mouse.
In the code behind, once the left button is pressed, we are going to set a global variable to point that user has started moving. within the mouse move event, we are going to get the current location of the mouse pointer and then set the new position for the border control. once the left mouse button is discharged, we are going to reset the global variable in order that we are going to not move the item from now on.
See the code for the code behind class:
public partial class Page : UserControl
{
// Global variable to indicate if user has clicked border
// and started/stopped moving.
private bool moving = false;
private double offSetX;
private double offSetY;
public Page()
{
InitializeComponent();
}
private void border1_MouseLeftButtonDown(object sender, MouseButtonEventArgs e)
{
// Left mouse button clicked within border. start moving.
moving = true;
Point offset = e.GetPosition(border1);
offSetX = offset.X;
offSetY = offset.Y;
}
private void border1_MouseLeftButtonUp(object sender, MouseButtonEventArgs e)
{
// Left mouse button release. Stop moving.
moving = false;
}
private void border1_MouseMove(object sender, MouseEventArgs e)
{
if (moving)
{
// Get the new mouse pointer position
Canvas parent = (Canvas)this.border1.Parent;
Point p = e.GetPosition(parent);
double x = p.X - offSetX;
double y = p.Y - offSetY;
// Set the new position for the border control.
this.border1.SetValue(Canvas.LeftProperty, x);
this.border1.SetValue(Canvas.TopProperty, y);
}
}
}
HostForLIFE.eu Silverlight 6 Hosting
HostForLIFE.eu is European Windows Hosting Provider which focuses on Windows Platform only. We deliver on-demand hosting solutions including Shared hosting, Reseller Hosting, Cloud Hosting, Dedicated Servers, and IT as a Service for companies of all sizes. We have customers from around the globe, spread across every continent. We serve the hosting needs of the business and professional, government and nonprofit, entertainment and personal use market segments.

July 26, 2019 11:08 by
PeterHi, I want to download a pdf file form silverlight application , the pdf file is in a folder in my solution , i want to give the path of the pdf to the method and it should download the pdf to the local system. i am happy to say that i achieved it with the following code:
SaveFileDialog dialog = new SaveFileDialog();
dialog.Filter = "pdf Files|*.pdf";
dialog.DefaultFileName = "BeneficiaryDesignation.pdf";
if (dialog.ShowDialog() ?? false)
{
WebClient webClient = new WebClient();
webClient.OpenReadCompleted += (s, e2) =>
{
try
{
using (Stream fs = (Stream)dialog.OpenFile())
{
e2.Result.CopyTo(fs);
fs.Flush();
fs.Close();
}
}
catch (Exception ex)
{
MessageBox.Show(ex.ToString());
}
};
string str = App.Current.Host.Source.AbsoluteUri;
string path = App.appConfiguration.GetPDFPath("BeneficiaryDesignation.pdf");
str = str.Replace("/ClientBin/ProjectDemo.xap", path);
webClient.OpenReadAsync(new Uri(str), UriKind.RelativeOrAbsolute);
}
HostForLIFE.eu Silverlight 6 Hosting
HostForLIFE.eu is European Windows Hosting Provider which focuses on Windows Platform only. We deliver on-demand hosting solutions including Shared hosting, Reseller Hosting, Cloud Hosting, Dedicated Servers, and IT as a Service for companies of all sizes. We have customers from around the globe, spread across every continent. We serve the hosting needs of the business and professional, government and nonprofit, entertainment and personal use market segments.

May 23, 2019 05:30 by
PeterHow we can print the document in a Silverlight application.
Step 1
We have the PrintDocument Class which defines a reusable object that sends output to a printer.
PrintDocument
The PrintDocument object encapsulates all the information needed to print a page. They associate with the control which content can be print. They handle the events and operations of printing.
Namespace - System.Drawing.Printing.PrintDocument
[C#]
public class PrintDocument : Component
We can create an instance of the PrintDocument class, set the properties that describe how to print, and call the Print method to start the printing process. Handle the PrintPage event where you specify the output to print, by using the Graphics included in the PrintPageEventArgs.
Associate control to Print document
private void printDoc_PrintPage(object sender, PrintPageEventArgs e) {
// print current page
e.PageVisual = printPage;
}
Step 2
Create one user control page name as PrintPage.Xaml and design header and footer in this user control page like as following.
<Grid x:Name="LayoutRoot" Background="White">
<Grid.RowDefinitions>
<RowDefinition Height="Auto" />
<RowDefinition />
<RowDefinition Height="Auto" />
</Grid.RowDefinitions>
<!--Header-->
<Grid>
<TextBlock Text="HEADER" />
</Grid>
<!--Body-->
<ItemsControl Name="BodyItemsControl" Grid.Row="1" Margin="0,24" />
<ItemsControl Name="TemplateItemsControl">
<ItemsControl.ItemTemplate>
<DataTemplate>
<Grid>
<Grid.ColumnDefinitions>
<ColumnDefinition Width="Auto" />
<ColumnDefinition Width="Auto" />
<ColumnDefinition Width="*" />
</Grid.ColumnDefinitions>
<TextBlock Text="{Binding ID}" Margin="2" />
<TextBlock Text=" - " Grid.Column="1" Margin="2" />
<TextBlock Text="{Binding Description}" Grid.Column="2" TextWrapping="Wrap" MaxWidth="500" HorizontalAlignment="Left" Margin="2" />
</Grid>
</DataTemplate>
</ItemsControl.ItemTemplate>
</ItemsControl>
<Grid Grid.Row="2">
<TextBlock Text="FOOTER" />
</Grid>
Step 3
In MainPage.Xaml create an instance of PrintDocument like as following.
public MainPage() {
InitializeComponent();
this.Loaded += new RoutedEventHandler(MainPage_Loaded);
}
void MainPage_Loaded(object sender, RoutedEventArgs e) {
GetItems();
printDoc.PrintPage += newEventHandler < PrintPageEventArgs > (printDoc_PrintPage);
}
//following items for printing.
privatevoid GetItems() {
for (int i = 0; i < 100; i++) {
items.Add(newItem() {
ID = i,
Description = "This is Print Document " + i
});
}
}
//Handling the event when we're printing:
private void printDoc_PrintPage(object sender, PrintPageEventArgs e) {
PrintPage printPage = new PrintPage();
// print current page
e.PageVisual = printPage;
e.HasMorePages = true;
break;
}
Step 4
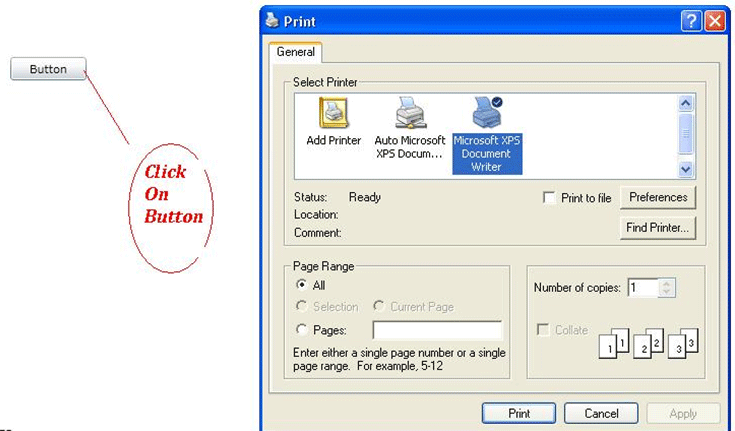
Add a button to the MainPage.Xaml and print the document when the button is clicked,
<Button Content="Button" Grid.Row="1" Height="23" HorizontalAlignment="Left" Margin="42,56,0,0" Name="button1" VerticalAlignment="Top" Width="75" Click="button1_Click" />
private void Button_Click(object sender, RoutedEventArgs e)
{
printDoc.Print("Printing A Page");
}
Step 5
Output look like as following,
HostForLIFE.eu Silverlight 6 Hosting
HostForLIFE.eu is European Windows Hosting Provider which focuses on Windows Platform only. We deliver on-demand hosting solutions including Shared hosting, Reseller Hosting, Cloud Hosting, Dedicated Servers, and IT as a Service for companies of all sizes. We have customers from around the globe, spread across every continent. We serve the hosting needs of the business and professional, government and nonprofit, entertainment and personal use market segments.
May 17, 2019 11:36 by
PeterIn this post allow us to understand how to use ScrollViewer panel Layout inside a Silverlight application. ScrollViewer is an additional layout container, that we don’t use constantly. It's chiefly useful showing contents in an exceedingly scrollable panel such as ListBox or Editor window. ListBox, TextBox, RichTextBox internally uses ScrollViewer to implement the scrolling functionality. Allow us to discuss the implementation in this post.

As usual, open up visual studio and choose Silverlight project. We will discover there's a Grid layout in your MainPage. xaml. Eliminate the default Grid layout and merely drag and drop the Stack panel Layout into our application. The code for this looks such as:
<StackPanel x:Name="LayoutRoot" > </StackPanel>
Inside the stack panel I am just defining 12 different rectangles. And this is the code that I used:
<StackPanel x:Name="LayoutRoot" Orientation="Vertical" Width="100">
<Rectangle Height="50" Width="100" Fill="Red" />
<Rectangle Height="50" Width="100" Fill="Green" />
<Rectangle Height="50" Width="100" Fill="Orange" />
<Rectangle Height="50" Width="100" Fill="Tomato" />
<Rectangle Height="50" Width="100" Fill="WhiteSmoke" />
<Rectangle Height="50" Width="100" Fill="Green" />
<Rectangle Height="50" Width="100" Fill="Blue" />
<Rectangle Height="50" Width="100" Fill="Yellow" />
<Rectangle Height="50" Width="100" Fill="Azure" />
<Rectangle Height="50" Width="100" Fill="Gold" />
<Rectangle Height="50" Width="100" Fill="Blue" />
<Rectangle Height="50" Width="100" Fill="Violet" />
</StackPanel>
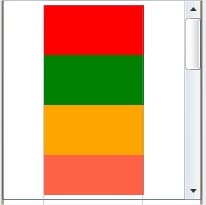
In case we compile the above code as it's, we will notice all of the rectangles however no scroll bar result. Thus in an effort to get scroll bar effect we ought to put the above stack panel inside scroll viewer and ought to offer fixid width towards the scroll viewer. And this is the code snippet:
<ScrollViewer Height="200" >
<StackPanel x:Name="LayoutRoot" Orientation="Vertical" Width="100">
<Rectangle Height="50" Width="100" Fill="Red" />
<Rectangle Height="50" Width="100" Fill="Green" />
<Rectangle Height="50" Width="100" Fill="Orange" />
<Rectangle Height="50" Width="100" Fill="Tomato" />
<Rectangle Height="50" Width="100" Fill="WhiteSmoke" />
<Rectangle Height="50" Width="100" Fill="Green" />
<Rectangle Height="50" Width="100" Fill="Blue" />
<Rectangle Height="50" Width="100" Fill="Yellow" />
<Rectangle Height="50" Width="100" Fill="Azure" />
<Rectangle Height="50" Width="100" Fill="Gold" />
<Rectangle Height="50" Width="100" Fill="Blue" />
<Rectangle Height="50" Width="100" Fill="Violet" />
</StackPanel>
</ScrollViewer>
Finally, Run the code and here is the result:
April 25, 2019 11:20 by
PeterA data grid view is a rectangular control made of columns and rows. I have a DataGrid where I have included some controls in column header. Each column is a Template column. These controls appear just below the column header which are used for entering filter information. Here's the issue on my code on Silverlight 5.
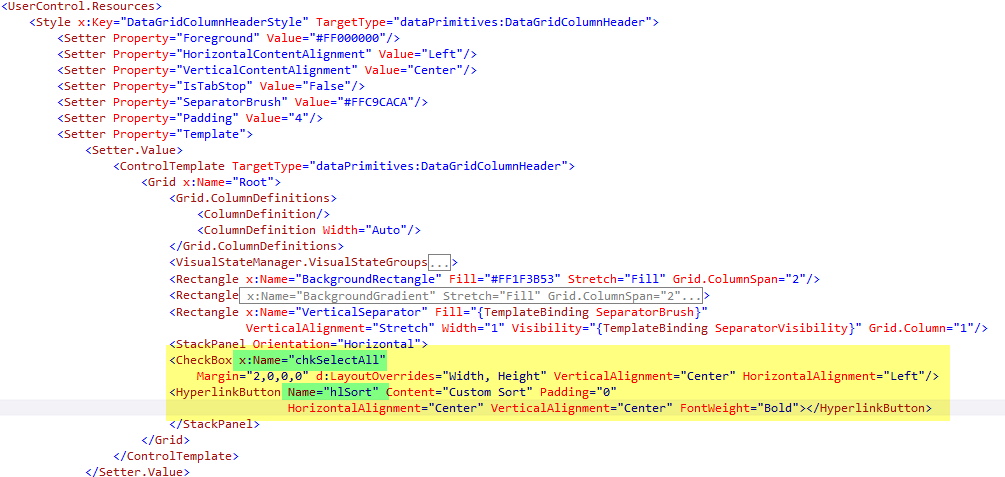

VisualTreeHelper class helps to iterate through the visual tree of the xaml. Using it we can find the child and parent controls of the rendered controls. Lets check the Visual Tree of the rendered control using Silverlight Spy.
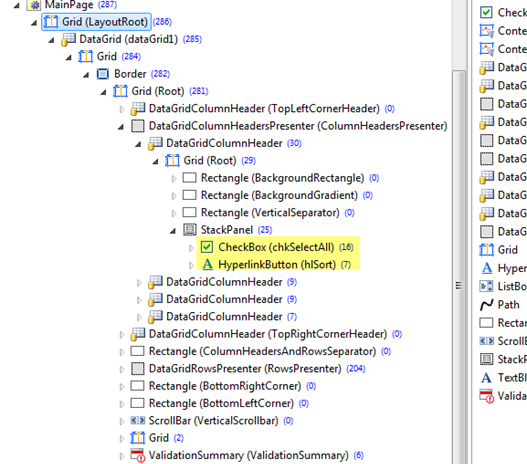
The Following Method do a search over the child controls with in a control recursively and returns the control based on Name.
private object GetChildControl(DependencyObject parent, string controlName)
{
Object tempObj = null;
int count = VisualTreeHelper.GetChildrenCount(parent);
for (int counter = 0; counter < count; counter++)
{
//Get The Child Control based on Index
tempObj = VisualTreeHelper.GetChild(parent, counter);
//If Control's name Property matches with the argument control
//name supplied then Return Control
if ((tempObj as DependencyObject).GetValue(NameProperty).ToString() == controlName)
return tempObj;
else //Else Search Recursively
{
tempObj = GetChildControl(tempObj as DependencyObject, controlName);
if (tempObj != null)
return tempObj;
}
}
return null;
}
Make sure that the same has to be delegated to UI thread using Dispatcher. As the controls created using UI Thread can not be accessed from other thread.
//Access the Grid Header Controls
Dispatcher.BeginInvoke(delegate
{
var hyperlinkControl = GetChildControl(dataGrid1, "hlSort");
var checkControl = GetChildControl(dataGrid1, "chkSelectAll");
});
March 27, 2019 09:46 by
PeterSo I was plugging right along in Silverlight using LINQ to asynchronously pull data from our database into my C# code. Everything was going great until I attempted to pull data from one table and its related tables all in one query. Here is what I found which resolved my data problem.
In my Library class I have the following code that enables my ASP.NET code to query a User by UserID and return a User object along with their UserFavorites and Illustration objects. This gives me everything I need to know about the user and their favorite illustrations.
public IQueryable<MyLibrary.User> GetUserByID(int userID)
{
    return myContext.Users.Include("UserFavorites").Include("UserFavorites.Illustration")
        .Where(u => u.UserID == userID);
}
In Silverlight I had a need to perform the same query using LINQ. After much searching on the web I found the two things that were needed to make this happen.
1. Use "Expand" instead of "Include"
2. Instead of "UserFavorites.Illustration" replace the "." with a "/" to get "UserFavorites/Illustration".
    int userID = 0;
    var qUser = ((DataServiceQuery<User>)(from myUser in service.Users
                  where myUser.UserID.Equals(userID)
                  select myUser))
                .Expand("UserFavorites")
                .Expand("UserFavorites/Illustration");
Now I have all of my data and I am happy once again. Using the Expand on my query is very nice in that I can get all of my data in one asynchronous call.
HostForLIFE.eu Silverlight 6 Hosting
HostForLIFE.eu is European Windows Hosting Provider which focuses on Windows Platform only. We deliver on-demand hosting solutions including Shared hosting, Reseller Hosting, Cloud Hosting, Dedicated Servers, and IT as a Service for companies of all sizes. We have customers from around the globe, spread across every continent. We serve the hosting needs of the business and professional, government and nonprofit, entertainment and personal use market segments.
